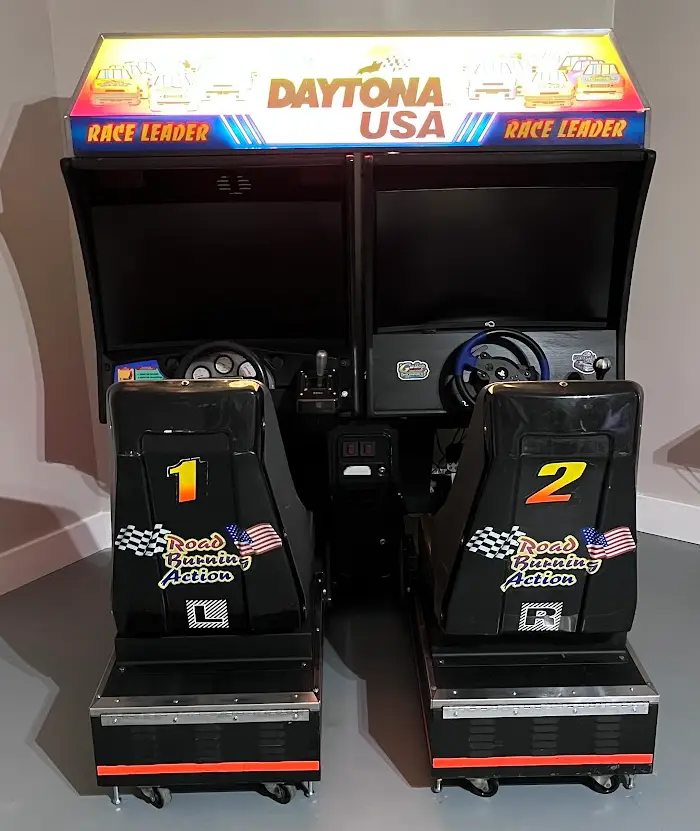
Daytona USA Twin Cabinet Refurbishing
In the summer of 2025, I came across a Daytona USA twin cab on Facebook Marketplace. I had been looking for just the seats, or even a simple shell of the cabinets for a couple of years, but they were always thousands of dollars. Well, that summer, luck was on my side. The two Daytona USA cabinets were listed for $100 a piece, with the Daytona USA marquee that goes above them listed for $100.
After convincing my wife that this was a worthy investment of time, money, energy, and space, I recruited my dad to drive about an hour from home to pick up the cabinets.
Goal of the Project
Before diving into all of the details, I should tell you that my goal was not to get these cabinets back to their original operating state – at least not yet. I wanted to maintain as many of the original components as I could, within reason, but I also wanted to run everything off of two PCs so my family could play more than just the first Daytona USA game on the cabinets. These things are HUGE and take up a large footprint, so my first priority was getting more than one game running on it.
That said, I tried to keep as many components as I felt I could in case I change my mind later and after the kids are grown up and out of the house. So if you’re looking to restore a cabinet back to its original glory, this post can help you with identifying how to take apart and refurbish some components, but I won’t be going into any detail on how the PCBs work, etc.
Initial Condition of the Cabinets
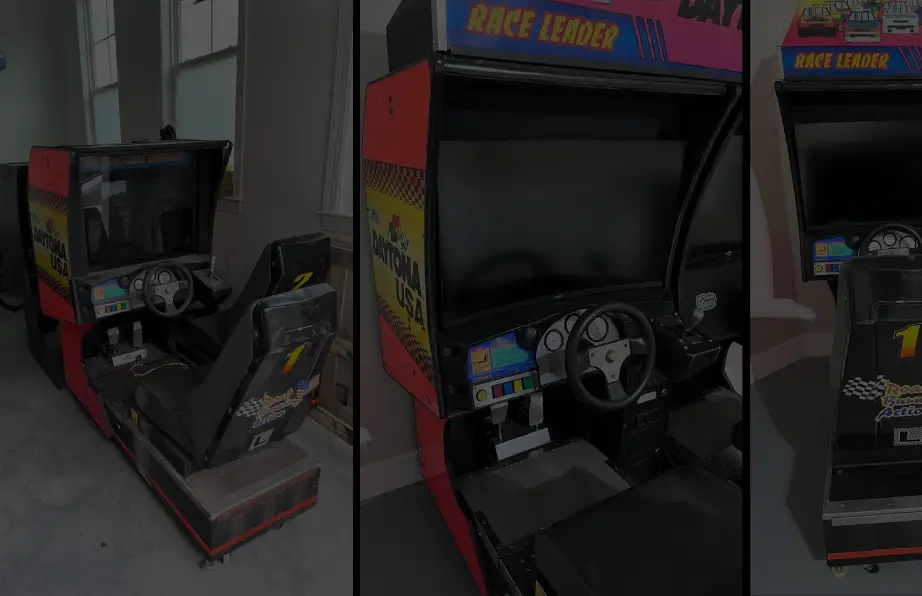
These cabinets had been warehoused for over a decade, and were in pretty rough shape. Both look like they had been tipped over, resulting in chipped corners, and both also had what looked like white or light pink paint overspray all over them.
Cabinet 1 had every component still in it. The guy who sold them to me even fired it up, and despite the monitor and sound not coming on, power cycled through it and the lights came on and the controller spun its wheel – the force feedback and wheel seemed to be operational! This was an unexpected surprise.
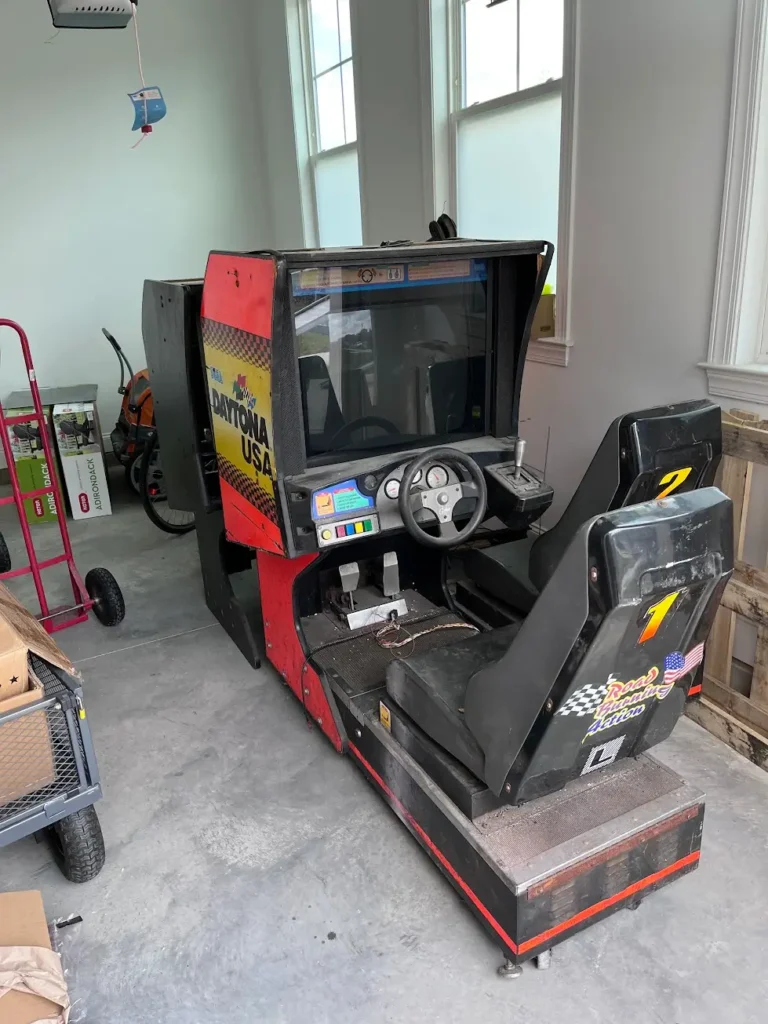
Cabinet 2 was another story. There was no monitor, the pedals were shot, and it had no steering control panel. It was basically a shell of the cabinet. But it did have all of its boards in the base of the machine and the side art was still intact, though in rough shape.
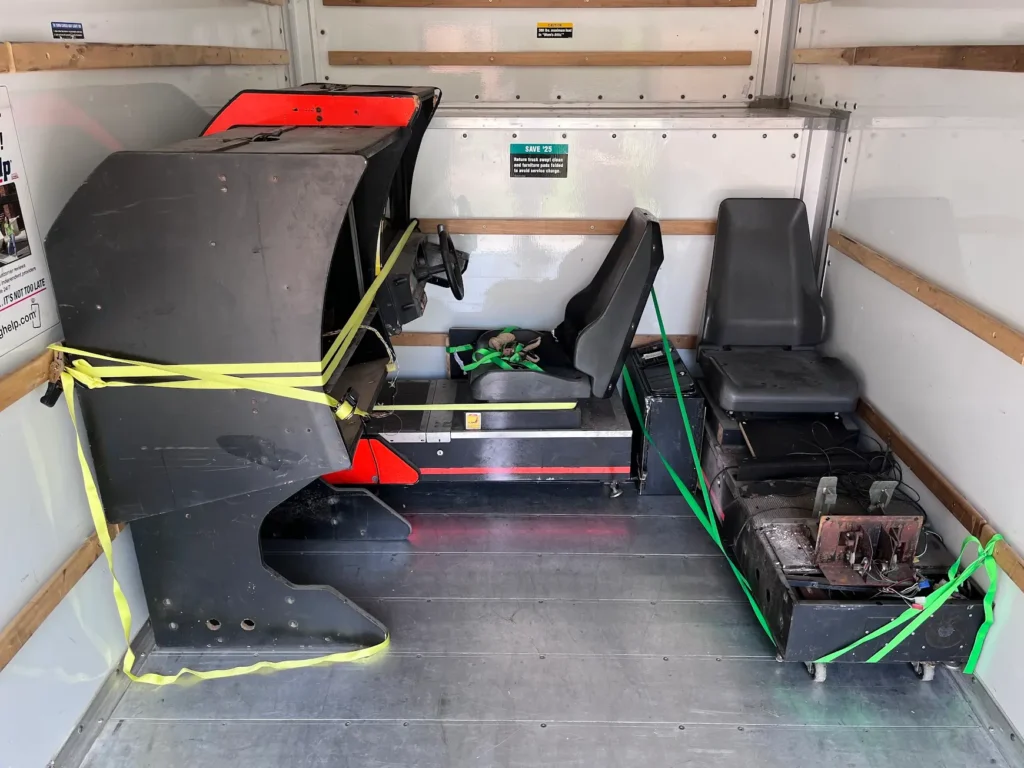
Other than their condition, the other thing to note about the cabinets is that they were HEAVY. I didn’t weigh them, but the specs of the Daytona USA Twin cabinets say that the overall unit weights around 1,200 lbs!
Each cabinet can be disassembled into two pieces for easier transport. We disassembled Cabinet 2 because it didn’t have a monitor and we weren’t as worried about it toppling over in the U-Haul. After loading Cabinet 2, we decided to keep Cabinet 1 intact and just roll it up the ramp of the truck. It took three of us, but we got it in and both machines secured.
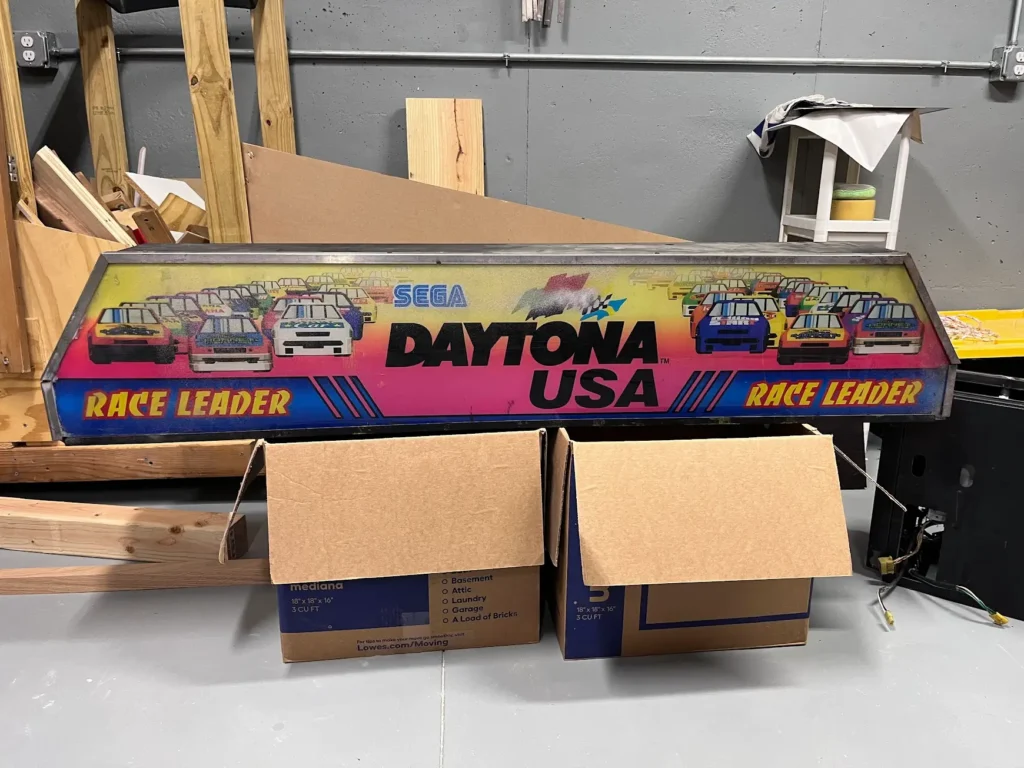
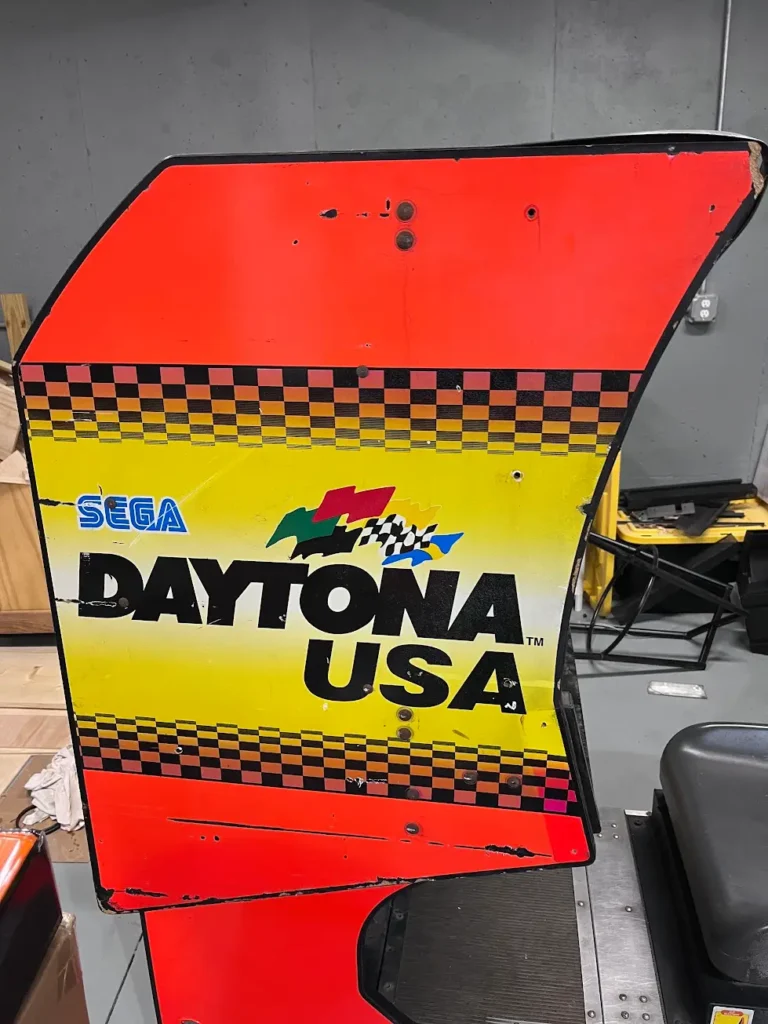
The Daytona USA marquee wasn’t in terrible shape, but the most prominent issue was that it had spray paint across the front of it. It was also a bit rusted and covered in grime.
Disassembling Daytona USA Twin Cabinets
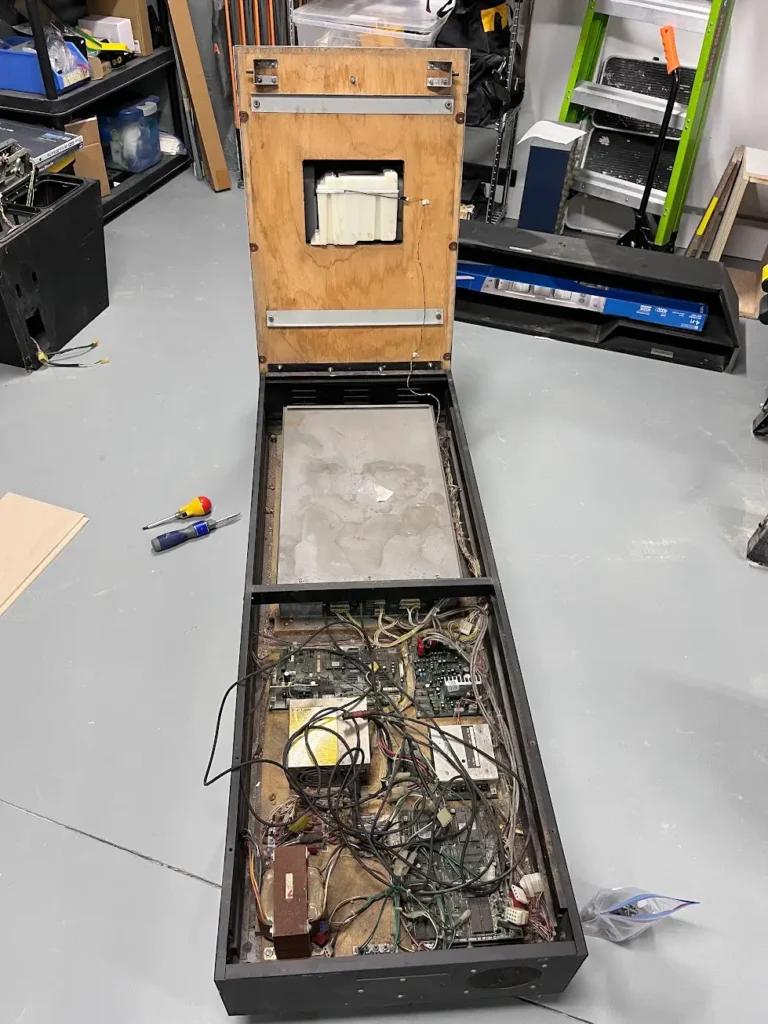
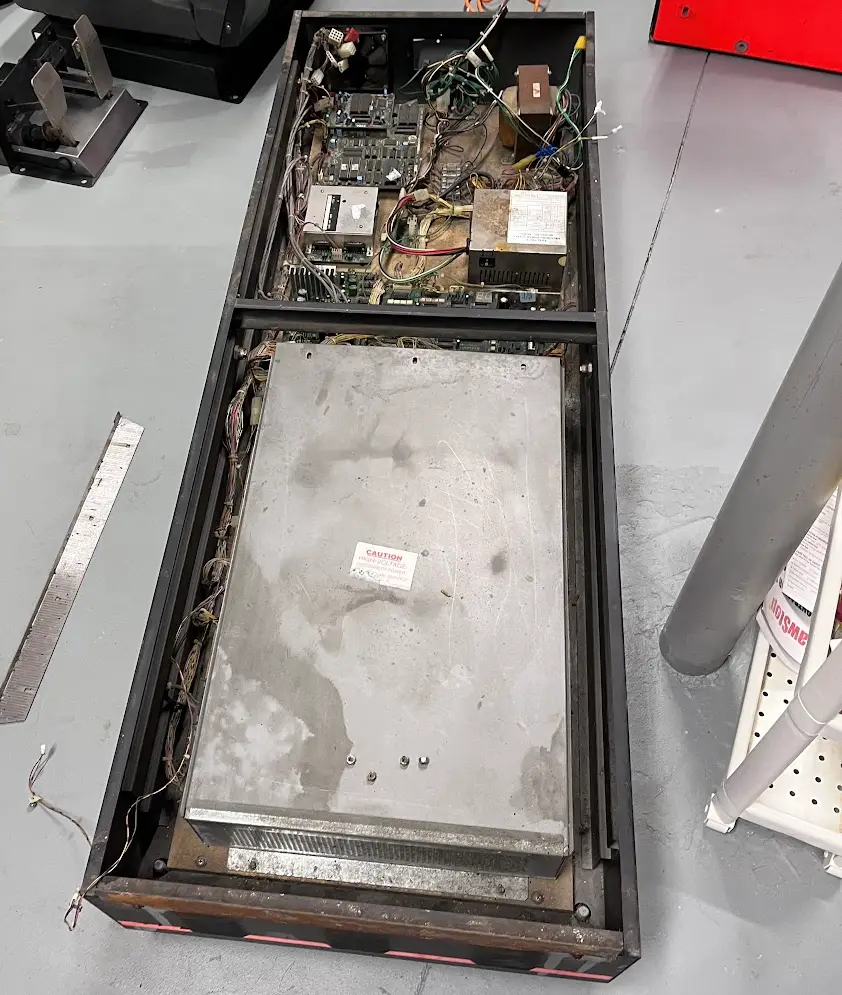
The first part of refurbishing these cabinets was tearing them down. Unlike most arcade machines, Daytona USA cabinets are composed of two main parts, the vertical cabinet that has the monitor and steering control panel in it, and the base, which houses all of the PCBs and power supply components inside and has the seat and pedals on it.
Removing the vertical cabinet from the base requires unbolting it from both sides of the cabinet. These bolts are threaded directly into the base. However, the pedals, which are mounted to the base, are also connected to the vertical cabinet via 2 screws. I had to take those screws off first, which I failed to do when we loaded Cabinet 2 into the truck. The result was that the screws held and ripped some of the particle board apart behind the pedals. It wasn’t a horrible mistake, but it did cause damage to the cabinet (more damage was to come!)
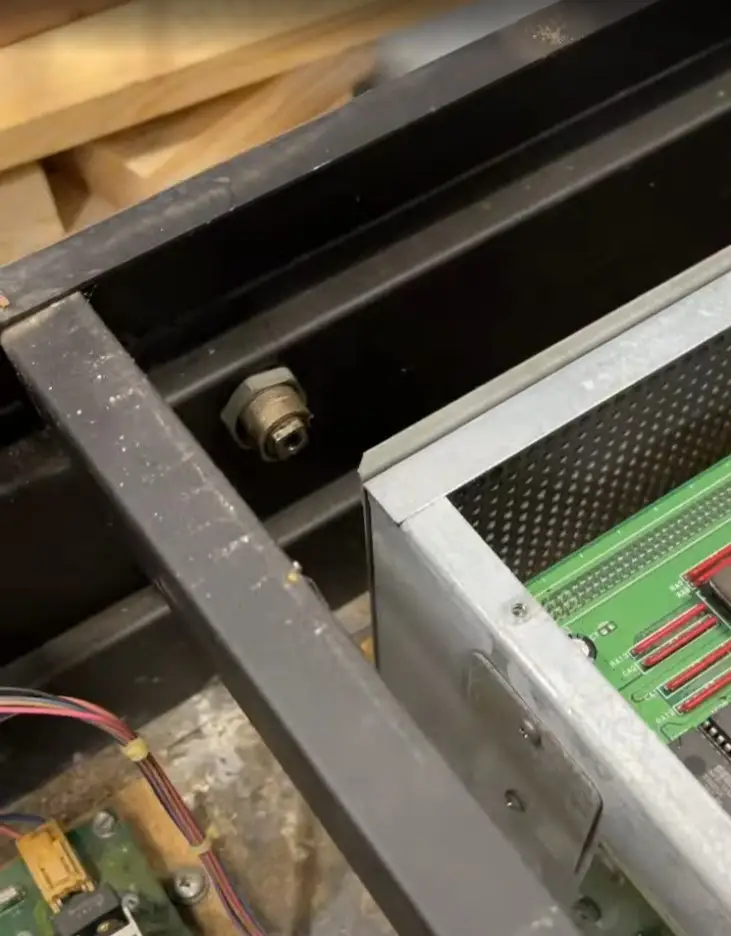
Before completely removing the vertical cabinet, I had to unclip all of the connectors that run from the vertical cabinet to the base. There are quite a few in the cabinet, and I had to double-check to make sure I got all of them unclipped before trying to remove the vertical cabinet from the base. For those connections that looked similar, I marked them with a Sharpie to make sure I reconnected them correctly.
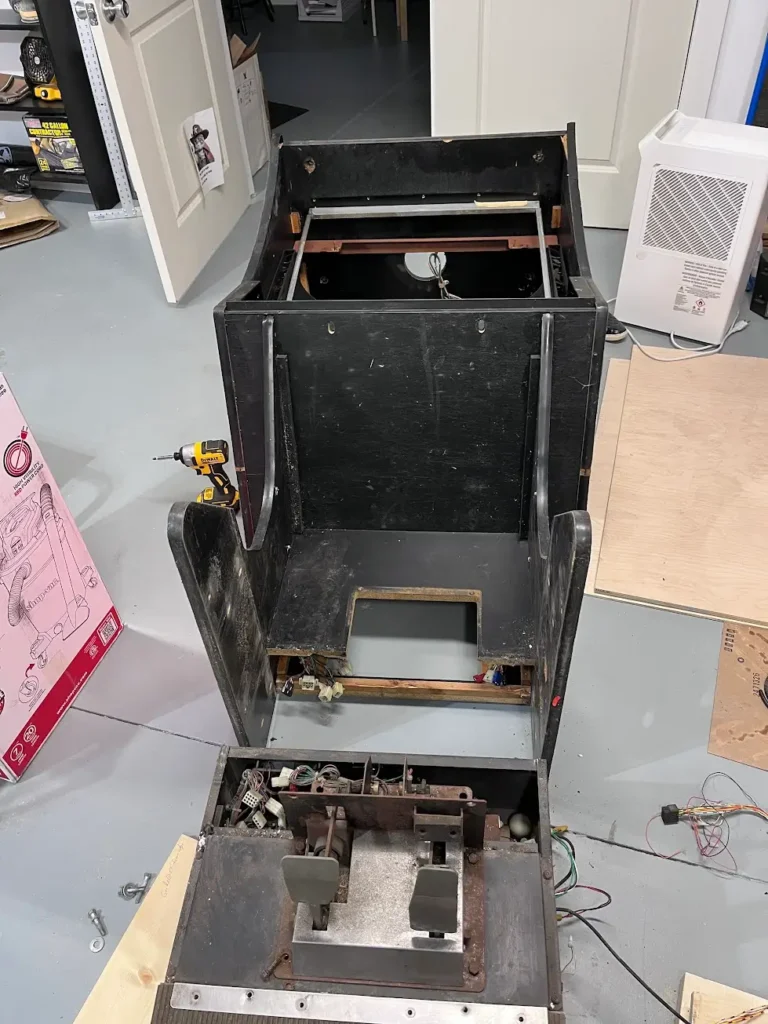
With the vertical cabinet separated from the base, it was time to get down in dirty.
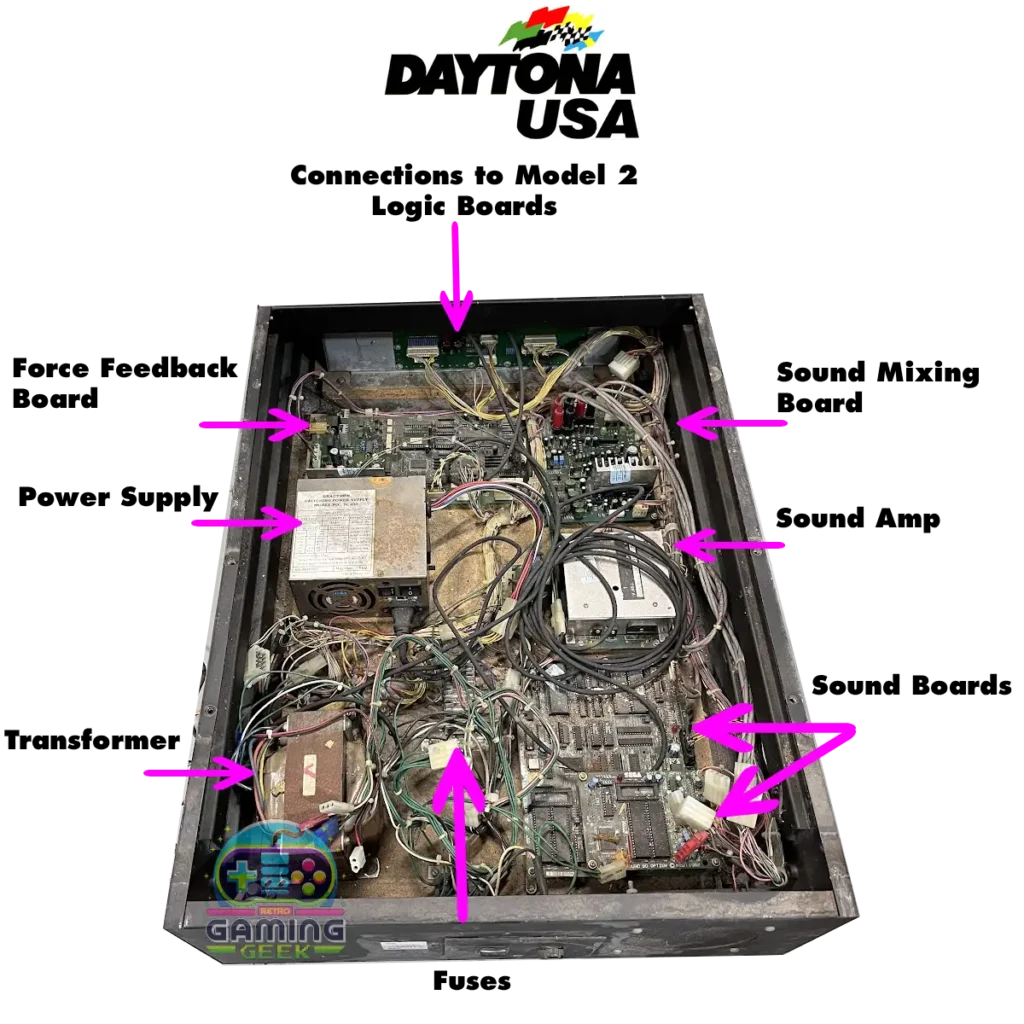
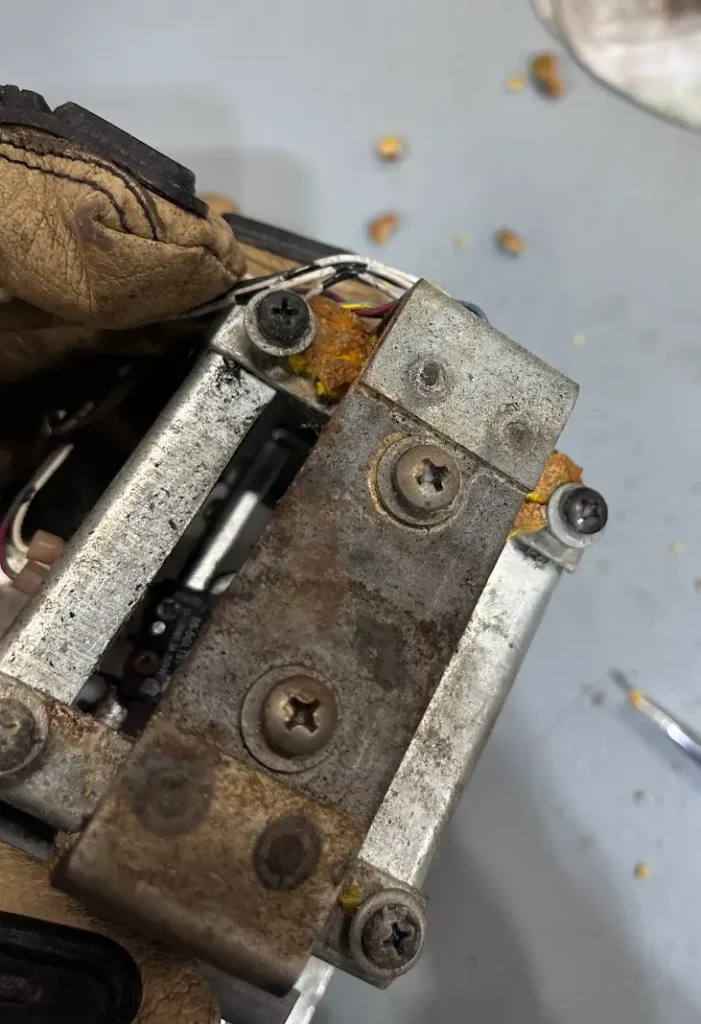
Daytona USA was well ahead of its time when it came to compute power, sound, and its force feedback system. All of this cutting-edge technology required a LOT of space. So, instead of housing all of the electronics in the vertical cabinet, Sega opted to utilize the base of the machine to hold everything. This makes sense, because that space would otherwise be wasted. BUT, that meant that over time the electronic components would get filthy from years of dust, food, drinks and who knows what else, dropped on the base of the machine while people played. The result is that the open section of electronic components under the pedals was filthy.
Dealing with the Locks
To access the components under the seat, you need to unlock the base of the cabinet with a key – a key I didn’t have. Everything I read online said to drill out the locks. I tried that with a cheap drill bit and it snapped within seconds. Then, I realized that I wanted to keep the locks to be decorative if possible, so I looked for another way into the machine.
Luckily, getting into the base of the cabinet isn’t that hard if you have the right tools. I bought a security screw set off of Amazon and was able to unscrew the front part of the base and take those off, exposing the electronics inside.
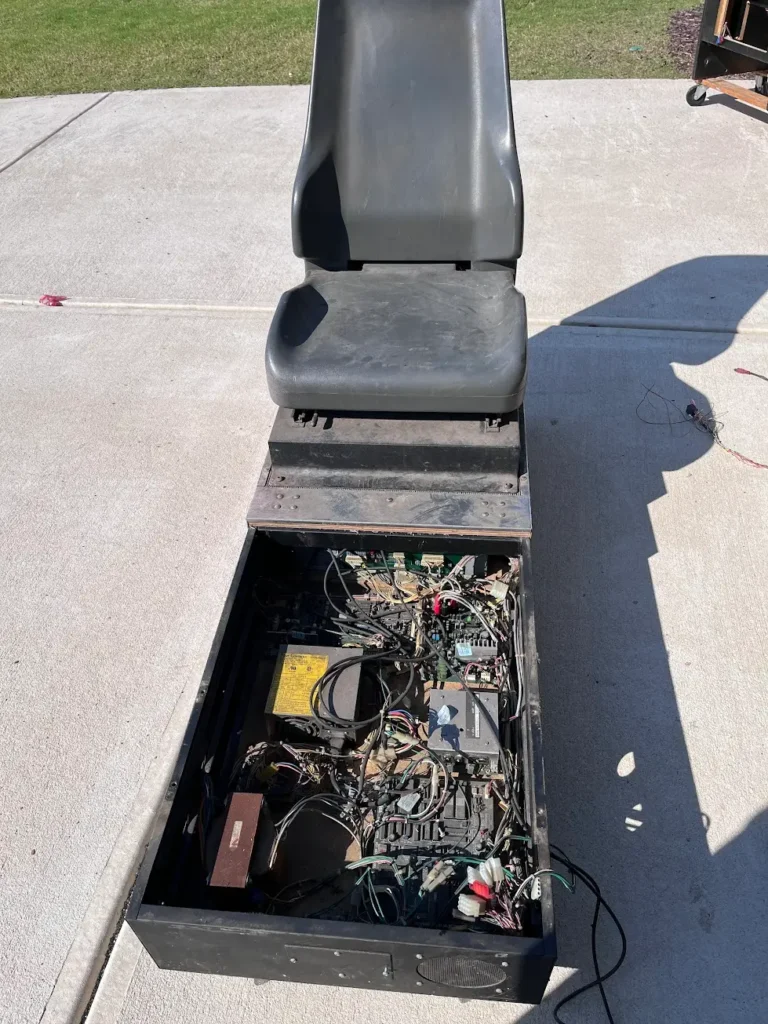
Then, I was able to remove the single screw from the locking mechanism from the inside of the machine, which then allowed the lock to be pushed out. With that out, the back of the base (with the seat) could flip up to reveal the logic board box.
You can access it without lifting the seat.
Rear Hinge
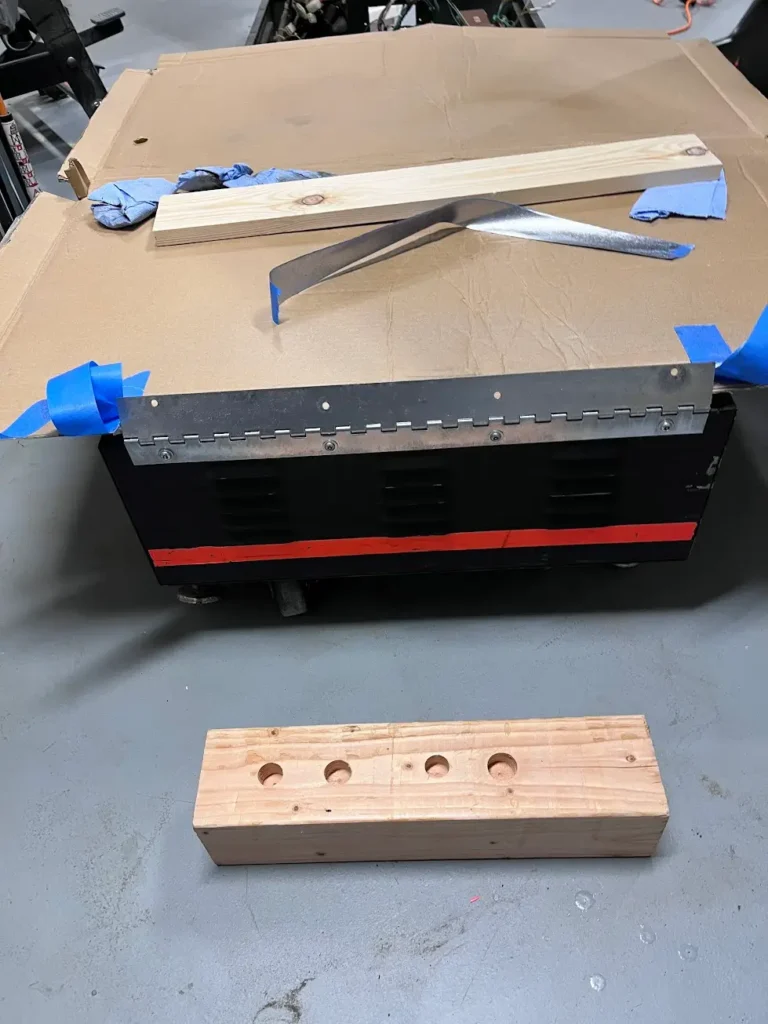
The seat base flips up and lays backward, rotating on a long piano hinge at the back of the machine. On my cabinets, both of these were completely rusted. I initially tried to unscrew the hinge to get around the locks but that didn’t work out as well as I would have liked. The best way to get around the locks is unscrewing them after taking off the front base plates.

I took off the back hinge from the seat and used a wire brush to scrape off a lot of the rust. I then used Rust-Oleum Rust Dissolver (multiple coats, wiping off each coat between uses) to get the majority of the rust off. However, using the Rust Dissolver left the metal raw and susceptible to rusting again, so I used some chrome Rust-Oleum spray paint on it to protect it and keep it looking nice.
Front of Base Components
When I first opened the front of the Daytona USA cabinet, I had no idea what anything was inside of it. The shear number of components, wires, and boards is a bit overwhelming to someone who had never taken apart an arcade before. Since then, I’ve gotten a good feel for what is inside and what most of the components do. For Cabinet 2, there was obvious damage to some of the boards. Fuses were missing, capacitors looked to be rough shape and some of the wires had been pulled out of their housings. There was no way I was going to try to save those components.
In the front is the power supply, which is fed through the back of the base. In Cabinet 2, this power comes through from Cabinet 1, which allows the whole twin cabinet to be powered from one cord to the wall. It’s a nice feature, but it adds a lot of complexity to the cabinets, as Cabinet 2 needs the power routed through the coin box (which sits between the cabinets). The other thing that goes between the cabinets is the networking cables, which to my amazement are fiber optic.
I read that Sega used fiber optic cables in Daytona USA twin cabinets because between the CRTs throwing off electromagnetic interference, switching power supplies, and possibility of ground loops, copper ethernet cabling would simply be too unreliable. So they went with fiber optic cables, which kept the data signals clean between the cabinets. That’s pretty amazing for a game from 1994.
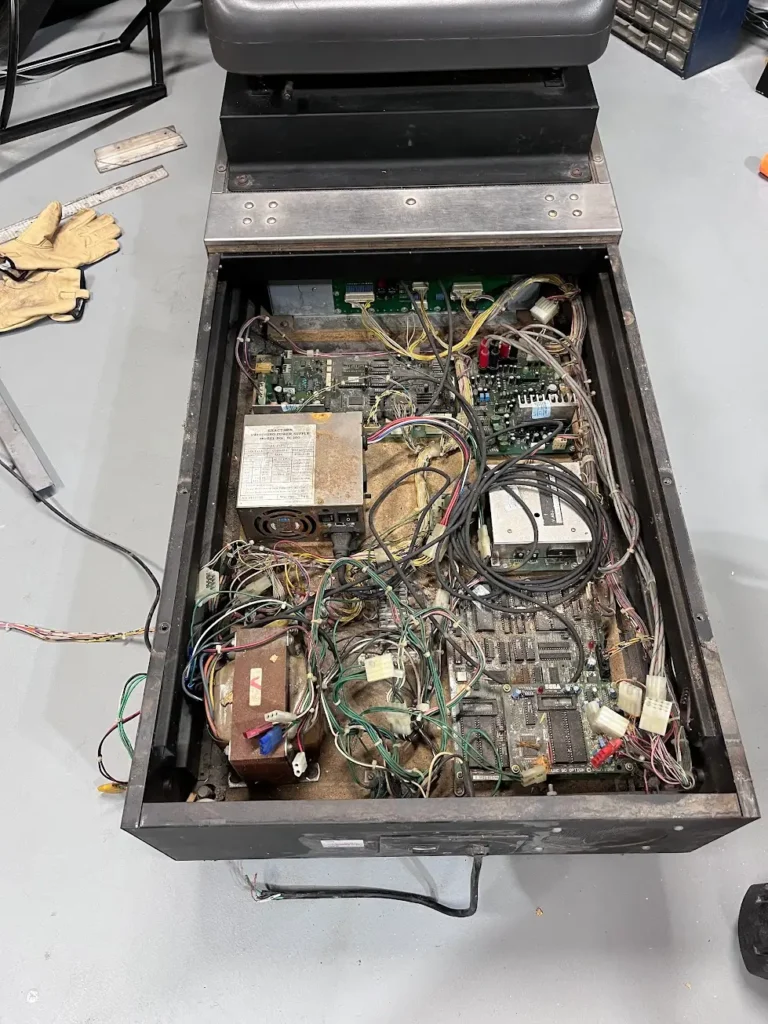
The boards inside the cabinet are mostly for sound and force feedback. The sound board includes an amplifier and cords run through the machine, feeding the various speakers in the control panel, behind the monitor, and the sub beneath the seat (to give the machine extra rumble.) The sound boards were not new for the Daytona USA cabinet, and have a manufacture date of 1992. They were originally used in Model 1 cabinets.
The first thing I did was get a leaf blower and blow out as much dust as I could out on my driveway. (In hindsight, wearing a mask and goggles would have been a good choice while doing this.) A lot of dust and debris came out of the system from that. But it gave me a place to start from. As I went to lift the seat to get to the rest of the electronics, I ran into an issue.
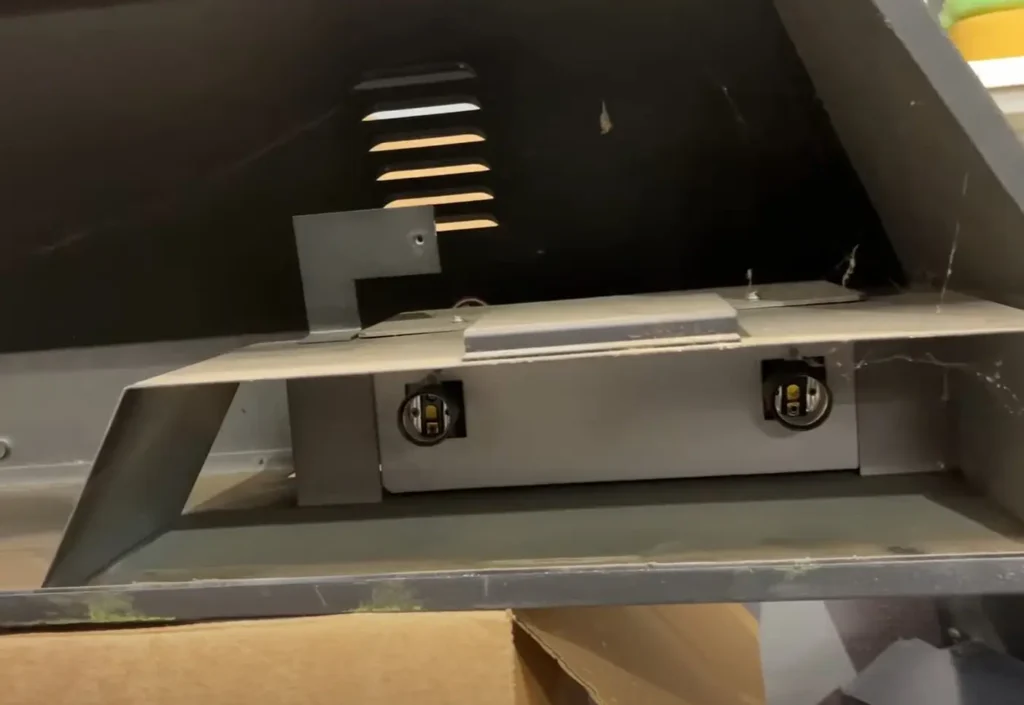
Under the Seat
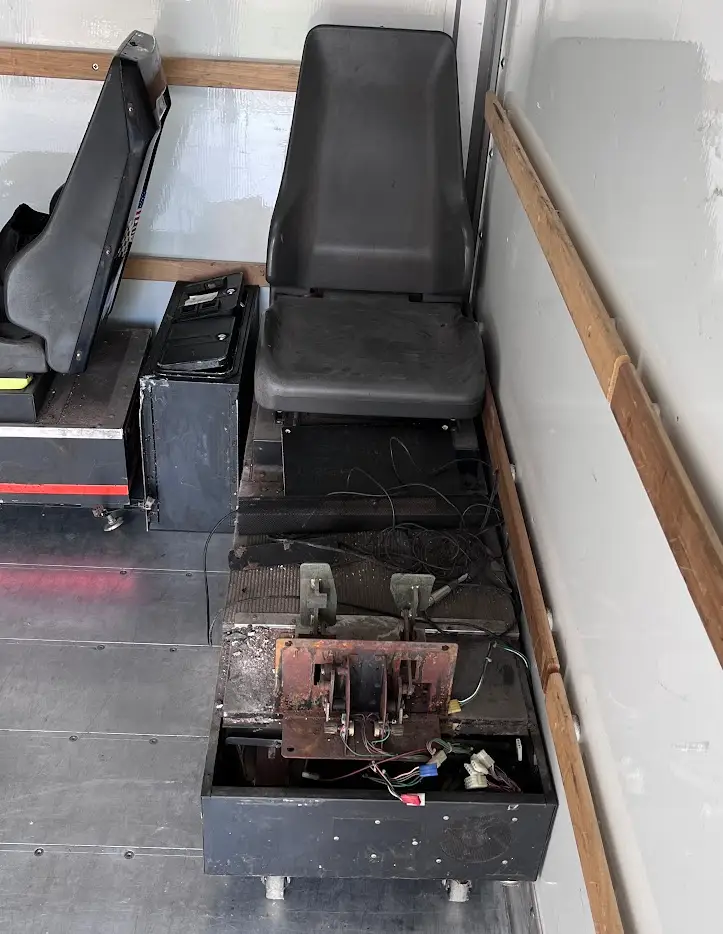
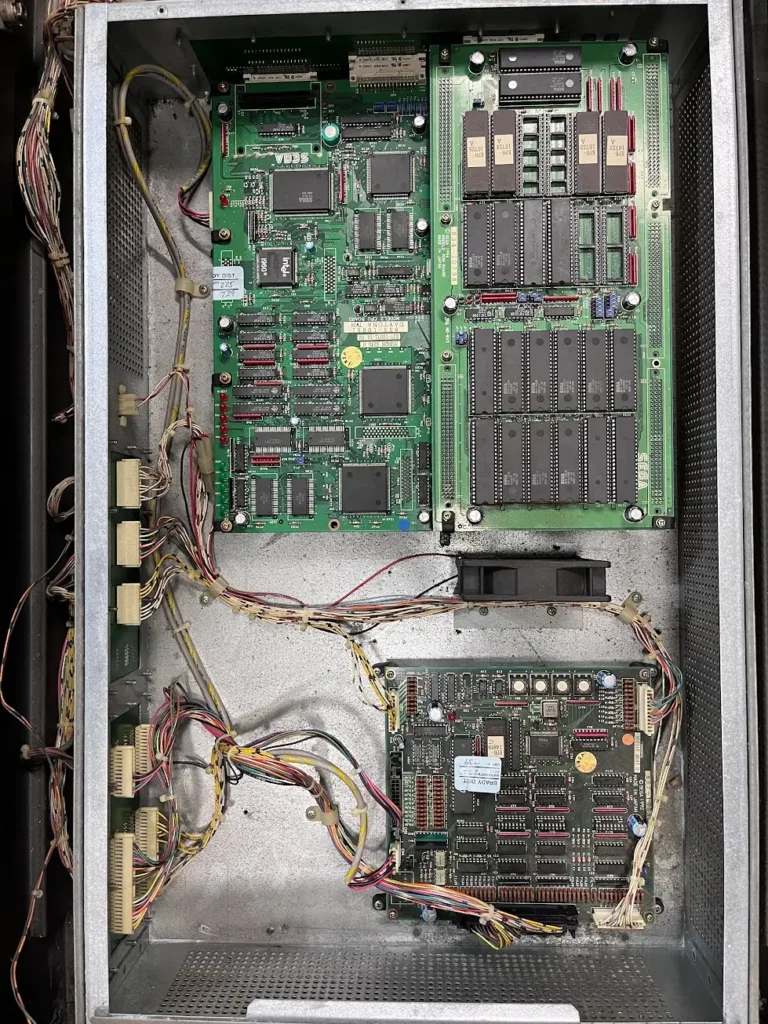
The Daytona USA seat pivots at the back and can be lifted up to reveal a metal box that contains the Model 2 boards. The power supply and other components connect via daughter boards into the metal housing on the front and side of the box. The Model 2 boards are presumably in the metal housing because they are more delicate and expensive than the power, force feedback, and sound boards found at the front of the machine.
When I opened the metal casing for each cabinet, I was shocked by what I found. Both Model 2 boards were in pristine condition. The metal housing had kept them as clean as the day they rolled off the factory floor. For as gross and nasty as the rest of the machine was, these boards were in perfect shape. Kudos to Sega for housing those Model 2 boards in the metal box which protected them for decades.
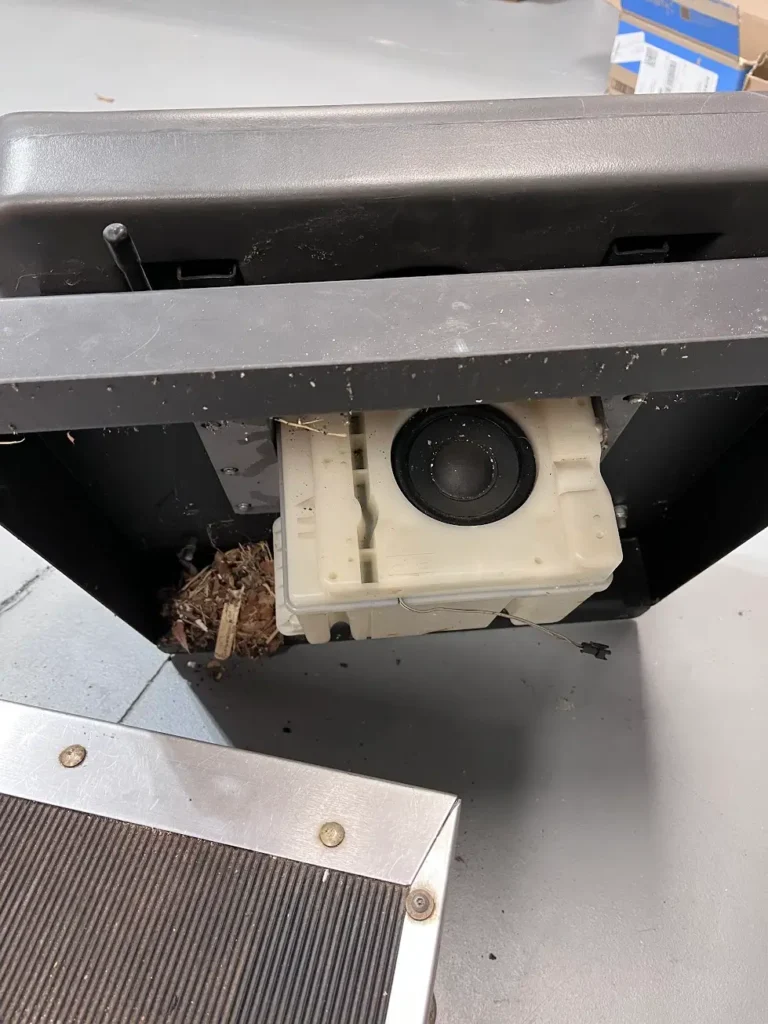
The other thing under the seat is the subwoofer, which is mounted directly to the frame of the seat itself. It’s in a plastic casing, which allows the sound to easily transfer to the seat and give the game that rumble effect, making it even more immersive. The sub is connected by a single wire back to the sound board.
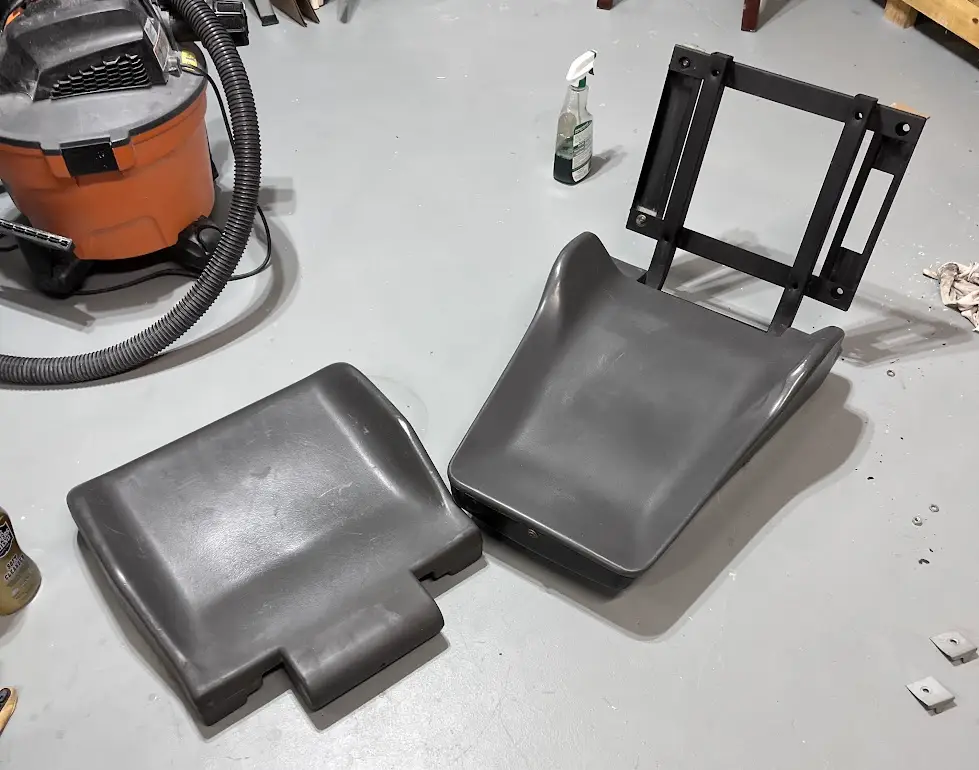
Daytona USA Seat Assembly
The seat assembly sits on the base and is held on with four bolts. I took the seat off entirely and disassembled the entire thing. This enabled me to access the the seat slides, which were mostly frozen due to a build up of debris in them. I was able to get out the debris and then lubricate the slides so they could move freely again.
I didn’t completely disassemble the first seat, which was a mistake. Both seats had debris in the seatbacks, which would come out every time I’d slide the seat back and forth on the base. The security screws around the seat itself (running around the side and on top of the seat) allowed the back of the seat to open and for me to clean everything out.
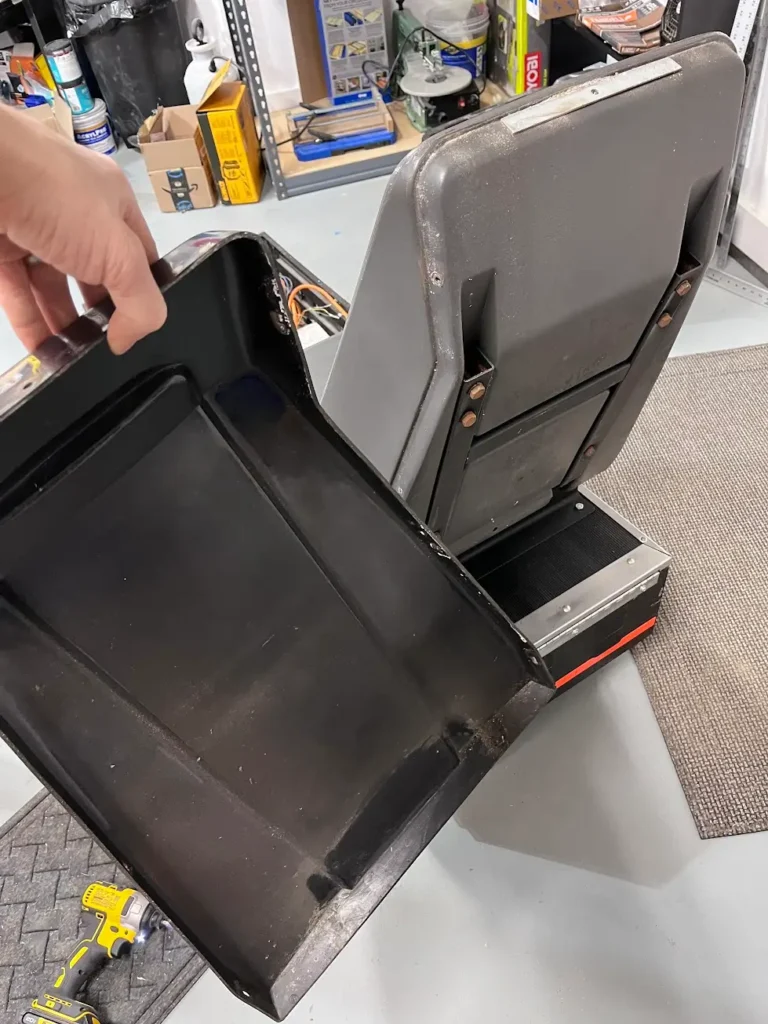
An important note with the entire seat disassembly: if you’re doing this and you encounter an issue where a bolt is hard to get at, you’re missing another step. During the disassembly of the first seat assembly I had a heck of a time getting the glides off of the rest of the seat. Well, turns out I didn’t take off the metal shroud on the bottom of the seat like I should have. On the second seat I learned my lesson and was able to disassemble the entire seat very quickly and without bloodying up my knuckles a second time.
Daytona USA Cabinet Pedals
The pedals of the Daytona USA Twin cabinet are mounted to the base of the machine with four decent-sized bolts that go into a metal plate on the base and also two pesky wood screws that go into the vertical cabinet. In the first machine I disassembled, the pedals were in really bad shape. I knew I was going to use sim-racing components for that cabinet, so I gave away the pedals to the person who bought the CRT from me.
On the other cabinet, I began cleaning up the pedals with a wire brush.
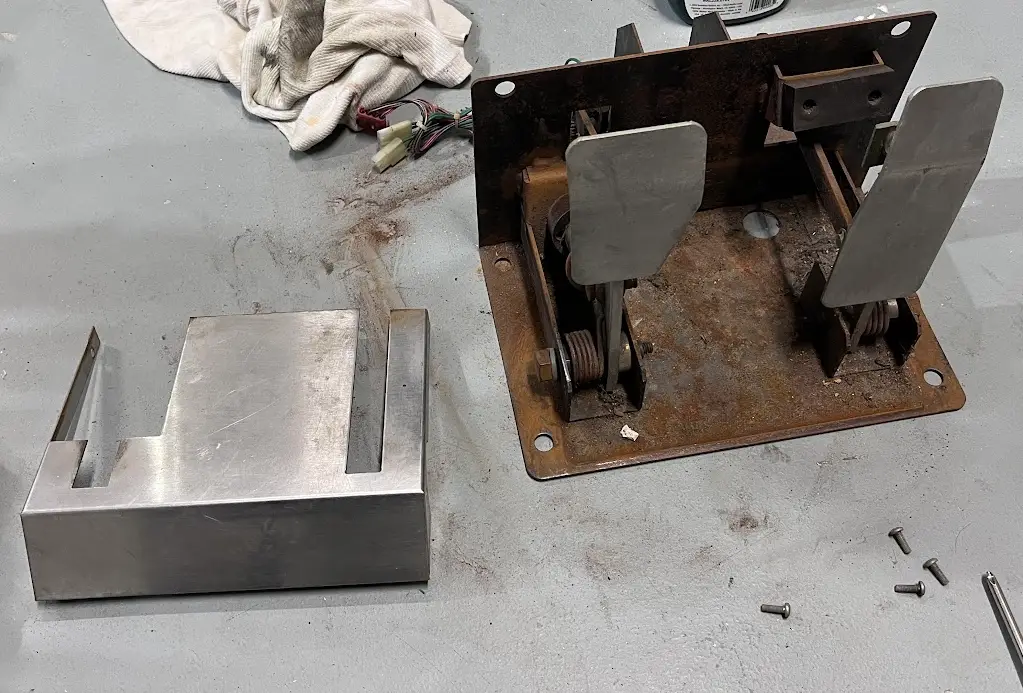
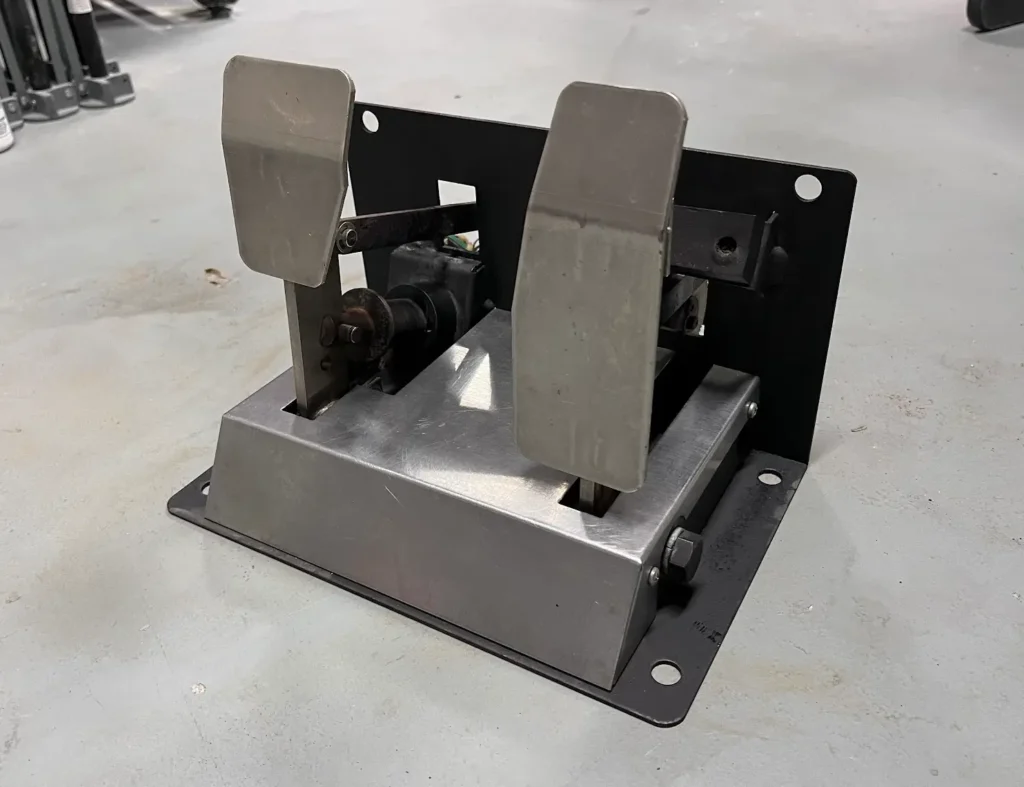
I was able to get a lot of the rust off with a wire brush and used more rust dissolver to get the pedals mostly clean. Since I used the rust dissolver, I needed to protect the raw metal, so I sprayed it with black Rust-Oleum paint, being careful not to paint any of the moving parts.
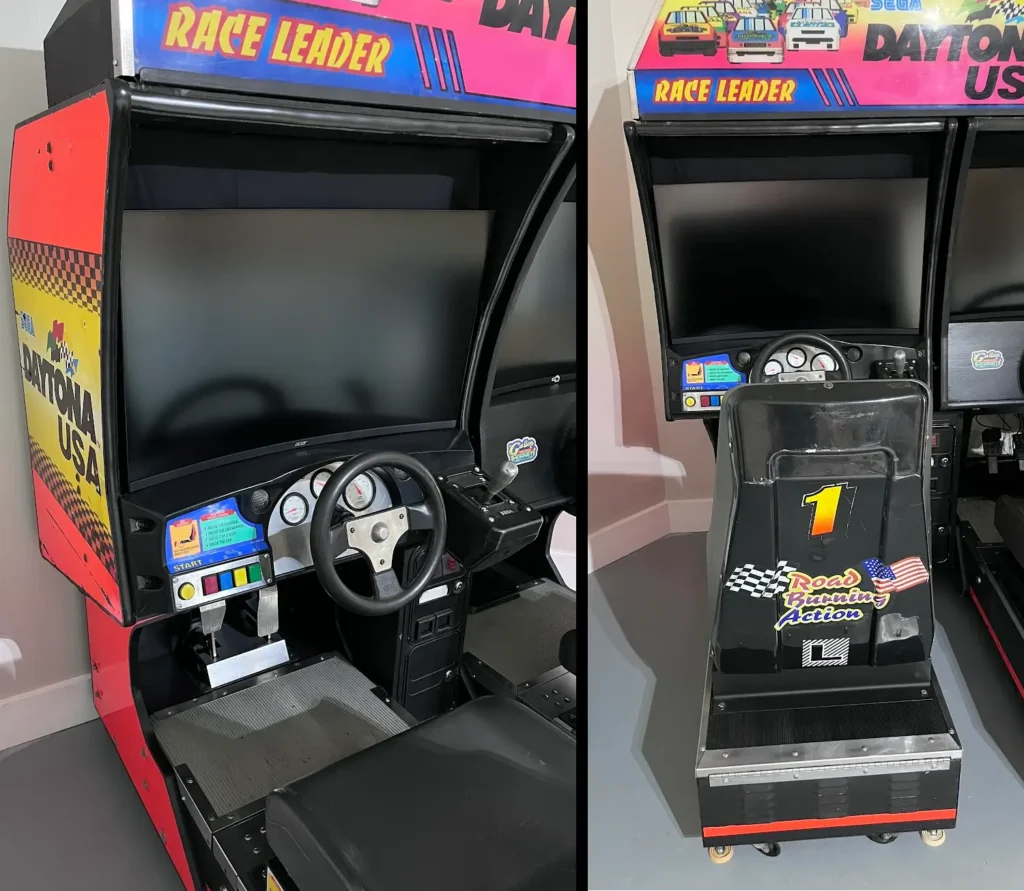
Vertical Cabinet
The vertical cabinet on the Daytona USA Twin cabinets is about the size of a normal arcade machine itself. It features the iconic Daytona USA artwork on one side, while the other side is laminated black because it butts up against the other side of the cabinet. Inside of the vertical cabinet is:
- A 25″ CRT monitor
- Steering control panel, including the gear shift
- Speakers mounted on the side of the monitor
A series of wires connect the vertical cabinet to the base, where all of the PCBs for the game are located. Most of these wires feed into the steering control panel, which itself is a large and heavy unit.
Before disconnecting the vertical cabinet from the base, I first removed the CRT and steering control panel. Just removing those two things probably reduced the weight of the vertical cabinet by over 100lbs.
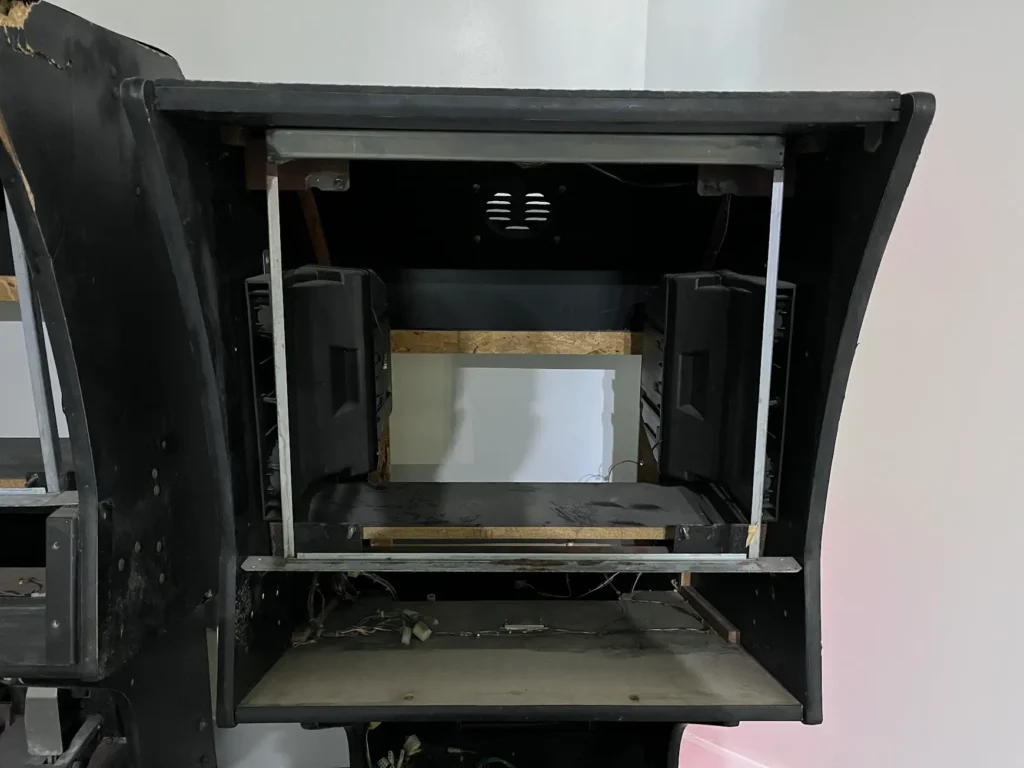
Daytona USA CRT
Only one of the units I had still had its CRT in it. Because I was going to not use the original Model 2 board and instead emulate the game (and many others), I decided to replace the CRT with an LCD monitor. However, the original CRT was a Wells Gardner Model 25K5191. I sold it to a guy who refurbishes monitors and also gave him the broken set of pedals I had. (By selling the monitor alone, I recouped half of the cost of the cabinet.)
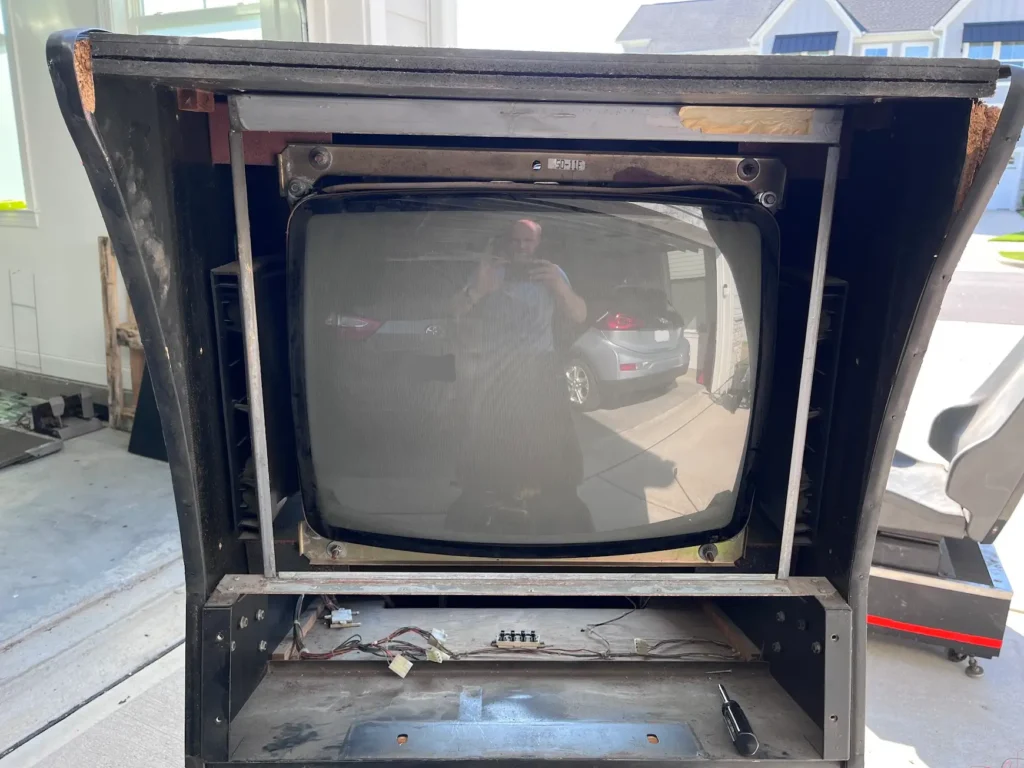
The CRT is held in place by a few metal brackets that run across the top and bottom of it. There are permanent bolts in these brackets, but once the nuts are removed, the entire CRT can be pulled out the front of the cabinet. In the picture above, the aluminum shroud that frames in the cabinet should be removed first so the CRT can be easily removed. It’s held in place by screws on the top and bottom.
Steering Control Panel
Daytona USA’s steering control panel features four view buttons on the left, the Gallup steering wheel and the H-style shifter. It also has two speakers that sit on each side of the steering wheel.
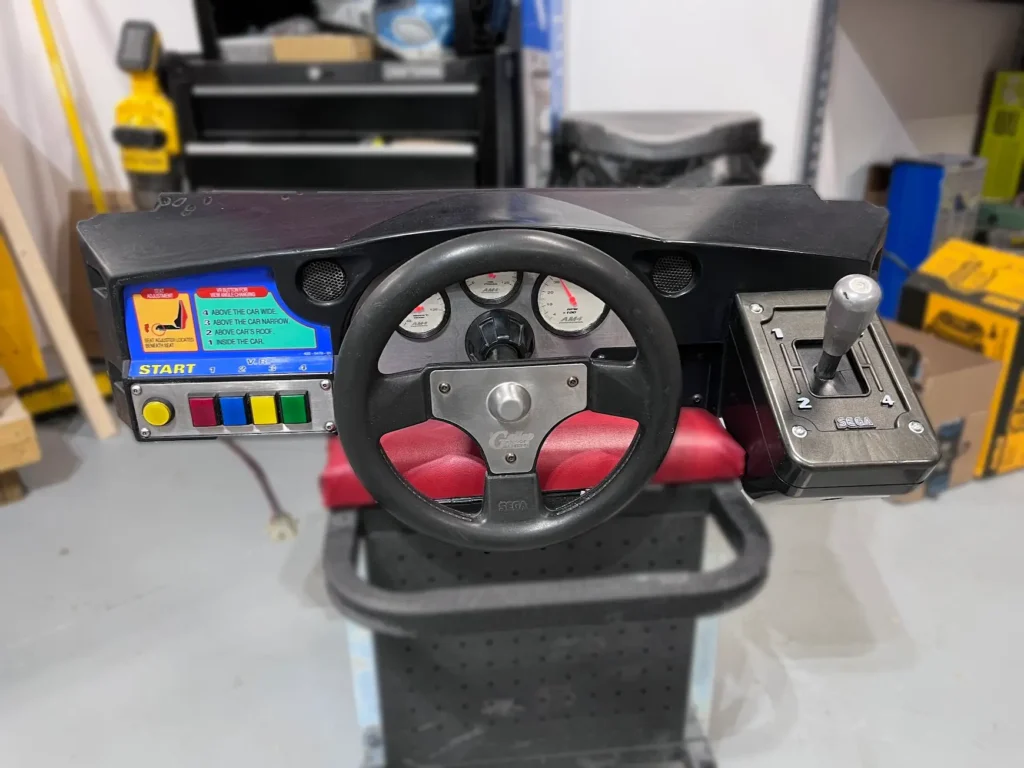
The steering control panel is held into the vertical cabinet with a lot of bolts, through the side, front, and bottom of the cabinet. The steering control panel is very heavy because it also has the force feedback motor on it. This motor supplies torque that responds to the game in real time.
One thing to note: A YouTuber posted a video about how he messed up his Daytona USA force feedback wheel because he cleaned all of the graphite powder/grease out of it, causing it to seize up. Luckily, I saw that before cleaning up the force feedback motor and for the most part just left it alone, cleaning only some visible grime.
Gear Shift Restoration
Most of the steering control panel was in decent shape, it just needed some light sanding to get off some spray paint and to be cleaned with Simple Green to remove decades of grime. However, the gear shift was in pretty rough shape.
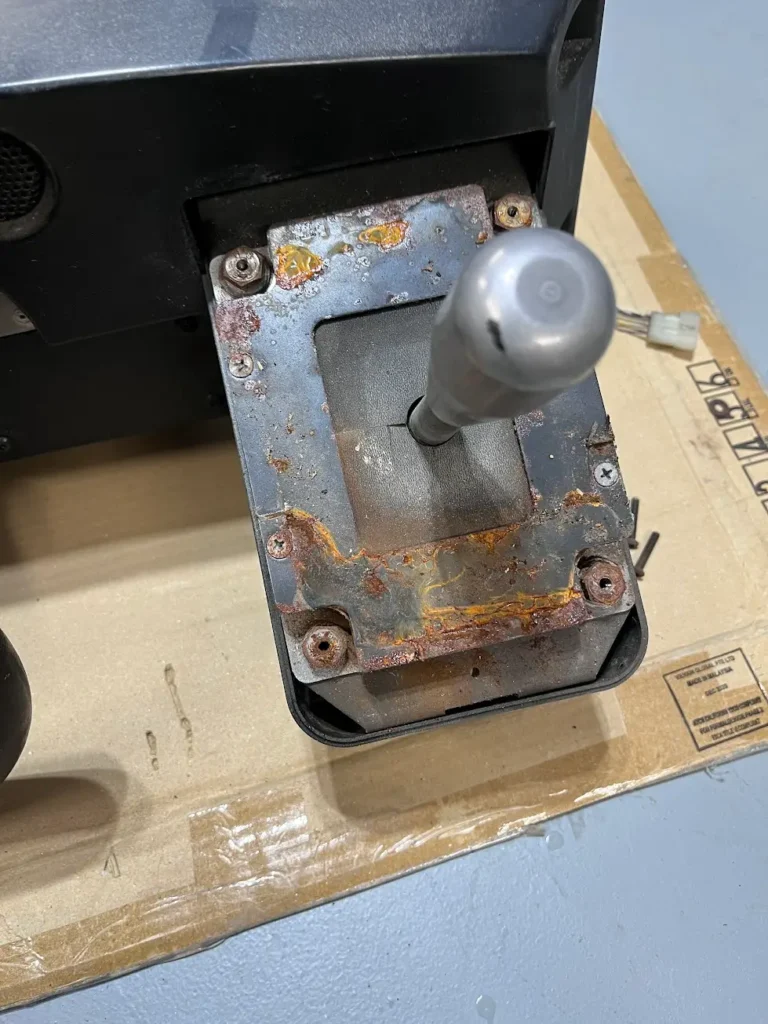
After I disassembled the gear shift, I saw that a plastic bumper at the bottom of the shifter had completely deteriorated and was causing the shifter to stick and also rattle. I removed what was left of the plastic bumper entirely and took a wire brush to everything else that was rusted. I ended up not replacing the plastic bumper because the shifter seemed to work fine without it. My guess is that the bumper was used to help the gears lock into place better, but in my testing the unit seemed fine without them.

I glued some of the plastic parts that were slightly cracked back together with simple super glue and reassembled the steering panel controller.
Vertical Cabinet Restoration
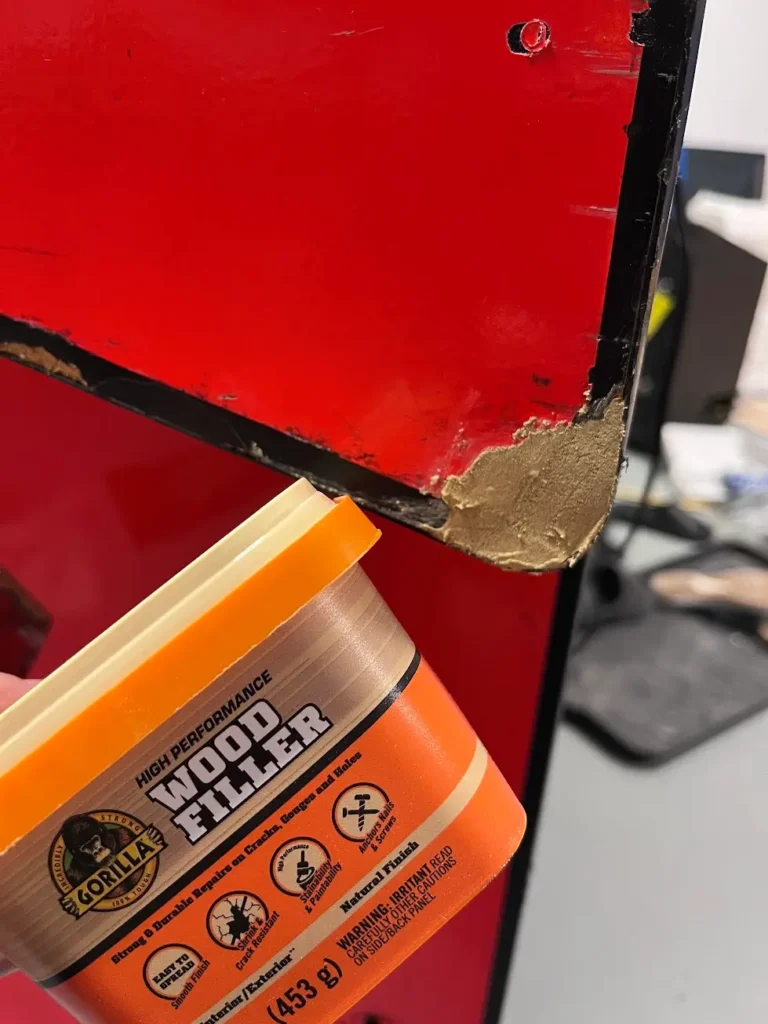
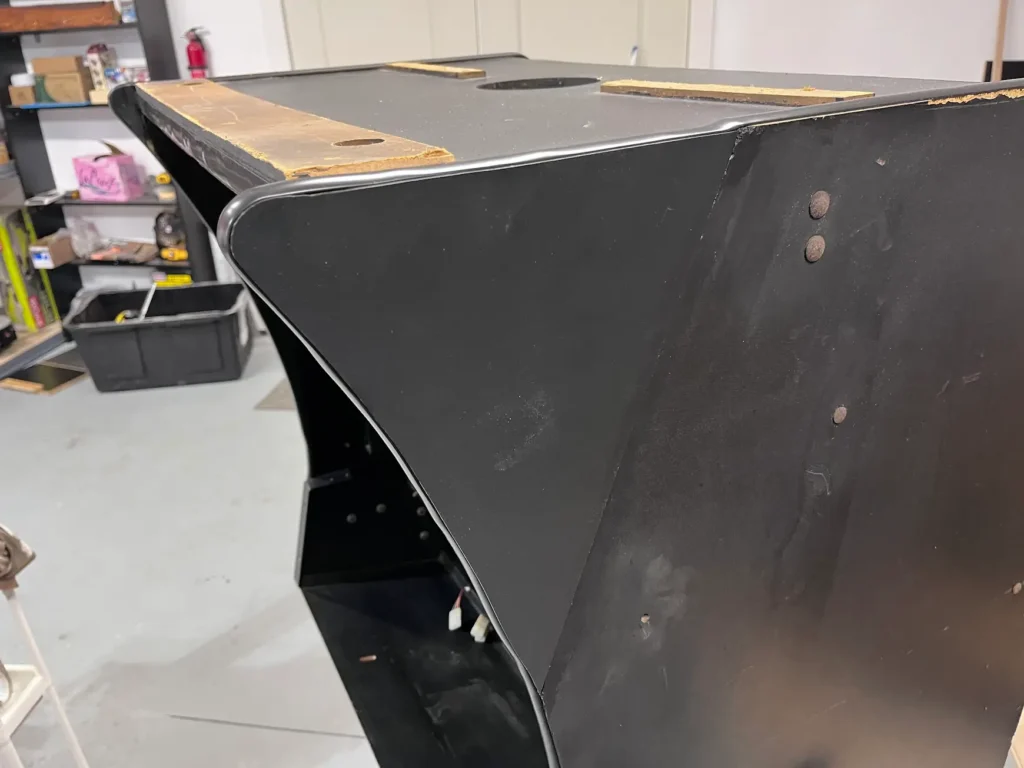
The artwork on the Daytona USA Twin cabinet was in fair shape, with chips of the laminate off in certain spots and rust stains running down from rusted bolts. The biggest issue with the cabinet was the broken pieces that appear to have occurred when someone tipped over the machine. On one cabinet, these were easily fixed with wood filler, sanded, and then painted black.
The big problem was the inside of Cabinet 1. This cabinet had an entire corner smashed in. It
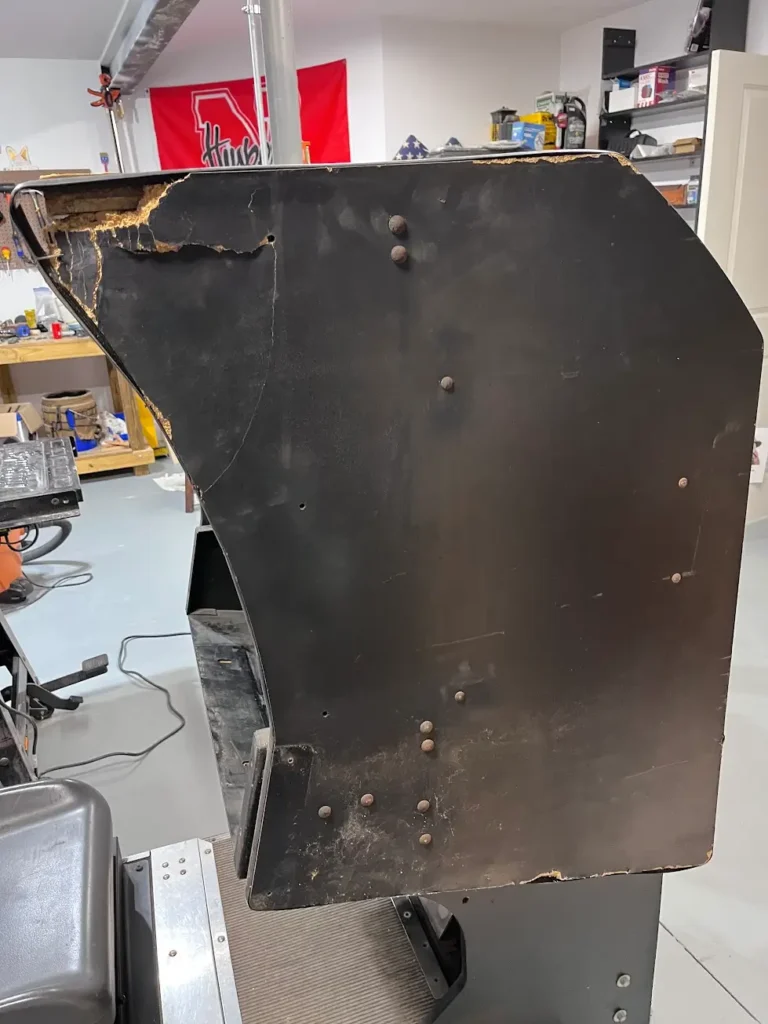
I ended up cutting off the entire corner and cutting out a new corner out of 3/4″ plywood using Cabinet 2 as a template. I secured it to the cabinet with wood glue and put two screws into the top of the piece, which went into the top of the cabinet. I clamped it up and also used some painters tape to help hold everything in place while it dried.
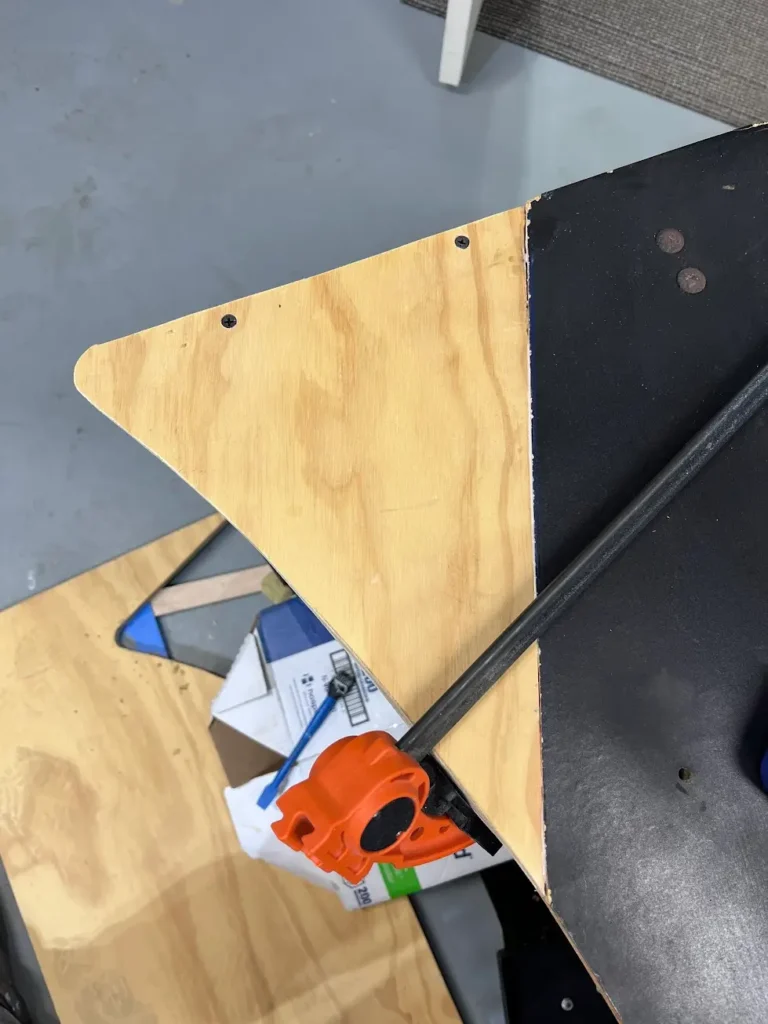
The 3/4″ plywood isn’t quite thick enough to just paint. The actual cabinet is laminated, so that adds thickness to the sides. I bought some flat black laminate and used industrial adhesive (3M Hi-Strength 90) to attach the laminate. The fix wasn’t perfect, but this is the inside edge of the cabinet that sits about 3″ away from the other twin cabinet, so you can’t really see it when you bring the twin cabinets together.
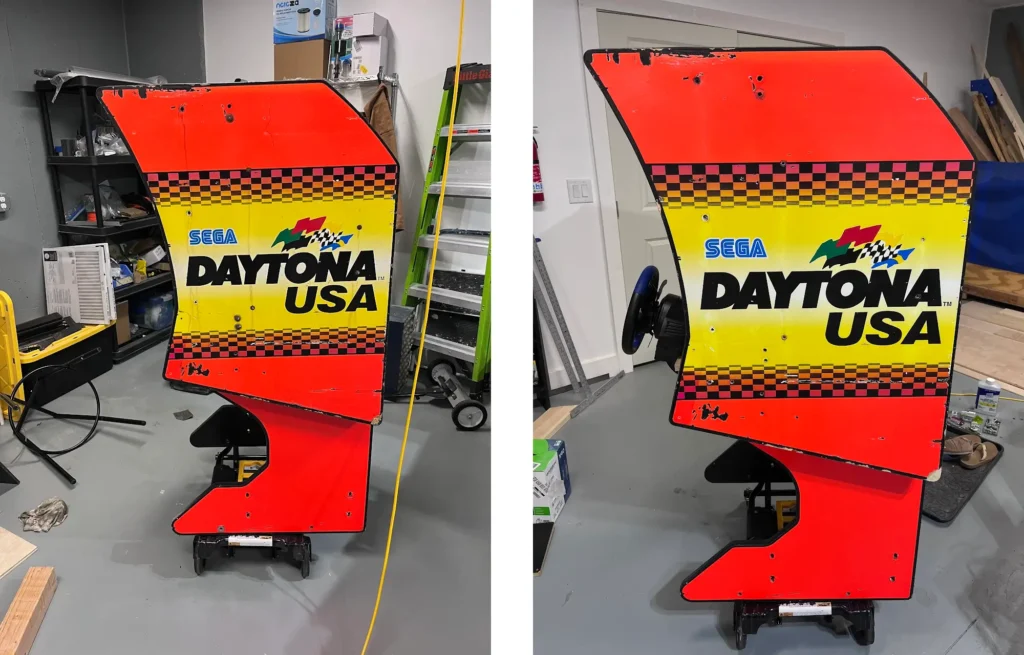
Daytona USA Artwork Restoration
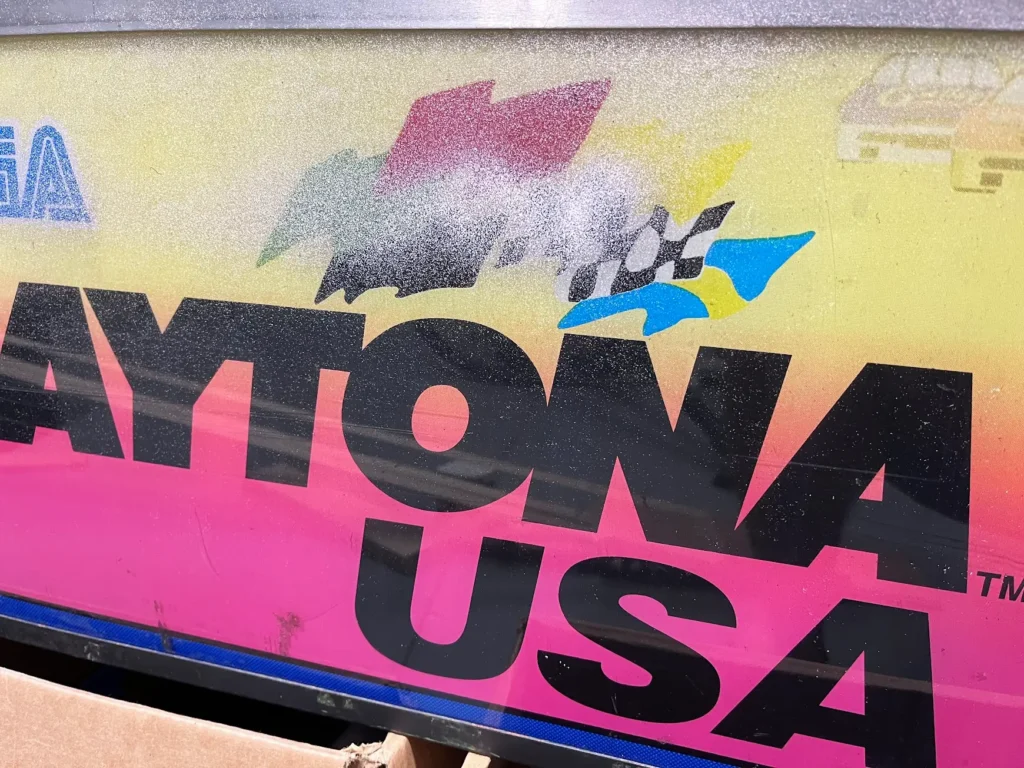
Like I mentioned before, the artwork was in fair shape. It had scuffs, scratches and long rust marks where the bolts had bled down the artwork. After trying a lot of different methods to get the rust off of the artwork, I found that using the liquid version of Bar-keeper’s Friend did the best job. It seemed to get down into the laminate and really scrub away the rust. However, it was removing laminate at the same time, so it was a delicate balance of knowing when to stop scrubbing. Overall, it did a great job of removing the rust and maintaining most of the look of the cabinet.
Daytona USA Twin Cabinet Marquee Restoration
Honestly, the first thing that caught my attention about these cabinets is that they came with the full marquee. In full transparency, I paid $100 for each cabinet and $100 for the marquee, setting me back $300 for the entire unit. The marquee alone goes for around $300 online if it’s fixed up.
This marquee was NOT fixed up. It was in rough shape.

Aside from the typical grime and rust, the marquee had also been hit with white/pink spray paint. I tried wiping this off with Simple Green, but it didn’t do anything to remove the spray paint. I also tried Goo Gone, but didn’t have much success either.
After a lot of trying, I finally decided to take the risk and use sandpaper on the acrylic. I used 800 grit sandpaper and started in an inconspicuous spot. To my surprise, it quickly removed the spray paint and barely scratched the acrylic. I sanded all of the other parts of the sign that had spray paint, first with 800 grit sandpaper and then again with 2500 grit to help smooth out some of the small scratches.
The sandpaper worked, clearing all of the paint from both the plastic and the metal trim of the marquee. I finished it with some Armor All Multi-Purpose spray to get all the dust and dirt off of the acrylic.
The acrylic came off easily after removing the aluminum trim around the front of the sign. Once unscrewed, the trim comes off and the sign acrylic lifts up and out of the sign. The inside of the sign was completely covered in dirt and grime, which took a while to clean up.
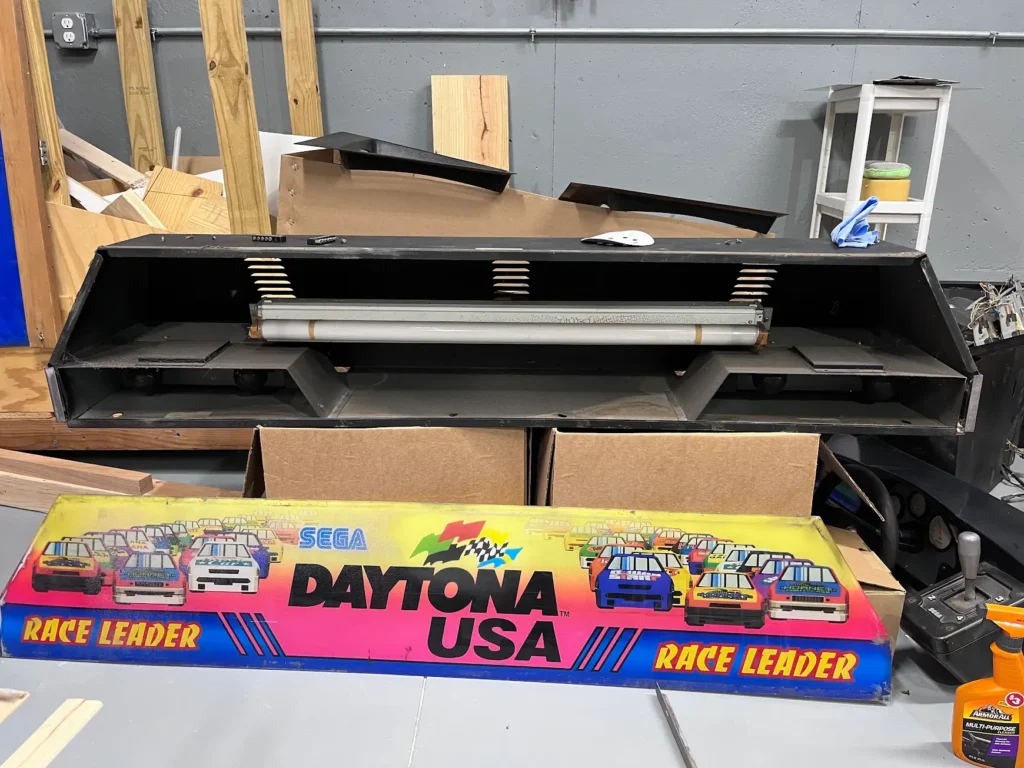
Inside the marquee were three separate lights. The biggest is the main fluorescent bulb in the middle, which lights most of the sign. Then, each Race Leader section of the sign has two incandescent bulbs behind it.
Daytona USA Marquee Light Replacement
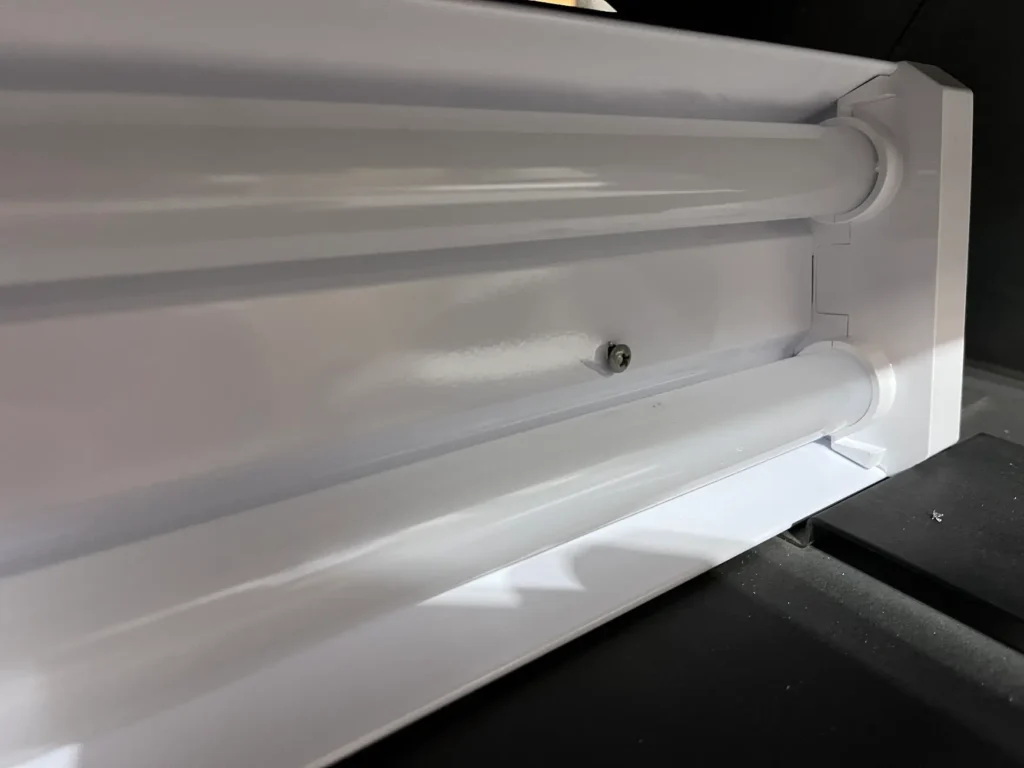
The lights in the Daytona USA marquee were dead, and since I was going to use emulation for the machine, I knew I wouldn’t be able to get the “Race Leader” sections of the sign to light up individually. Without having to worry about that type of logic coming from the main board, I opted to completely replace the lights inside with a simple LED shop light that I got at Lowe’s.
I removed the fluorescent bulb via a couple of screws that hold it to the frame of the marquee via two L brackets. Then I just unscrewed the ancient incandescent bulbs so they wouldn’t break in the process of the rest of the marquee’s restoration.
Once everything was removed and cleaned up inside the marquee, I drilled pilot holes through the new LED shop light and mounted it to the existing “L” brackets inside the marquee.
The aluminum trim got a good wire brush cleanup and I ended up cleaning and repainting the outside of the marquee with a flat black paint. Once re-assembled the finished product turned out pretty good.
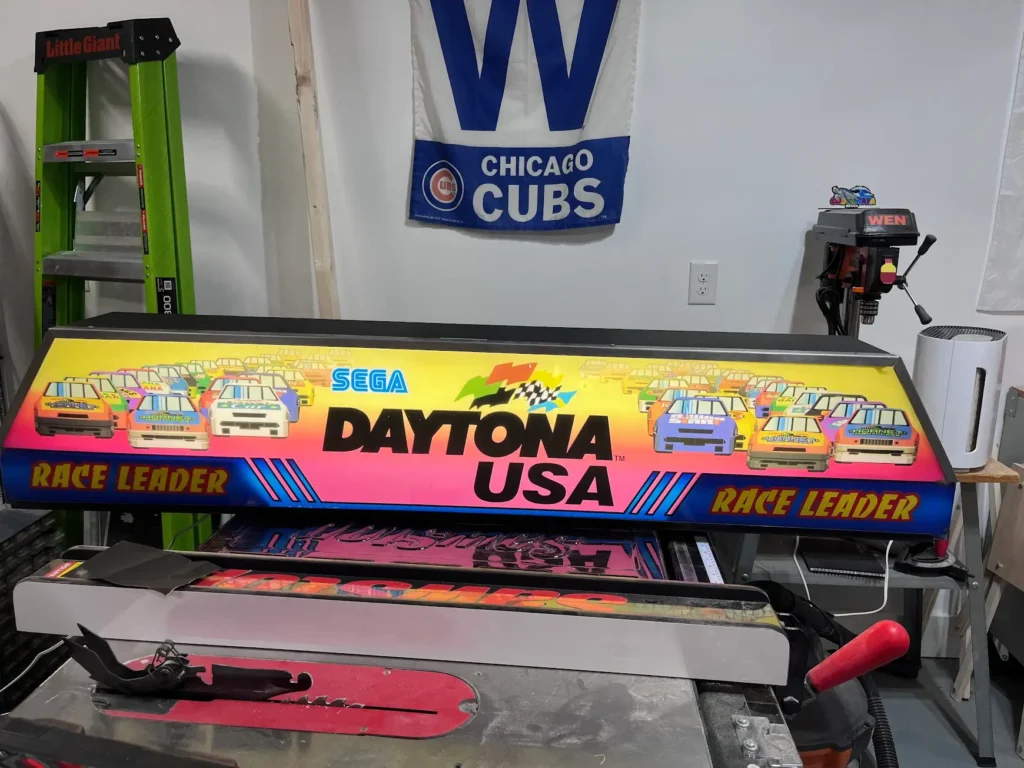
The drawback to this restoration is that the light inside the marquee plugs straight into an outlet and isn’t dependent on anything within the game, unlike the original which would light up the Race Leader section of the marquee as either twin cabinet would be in the lead. But, otherwise it turned out great.
Restored and Re-assembled Components
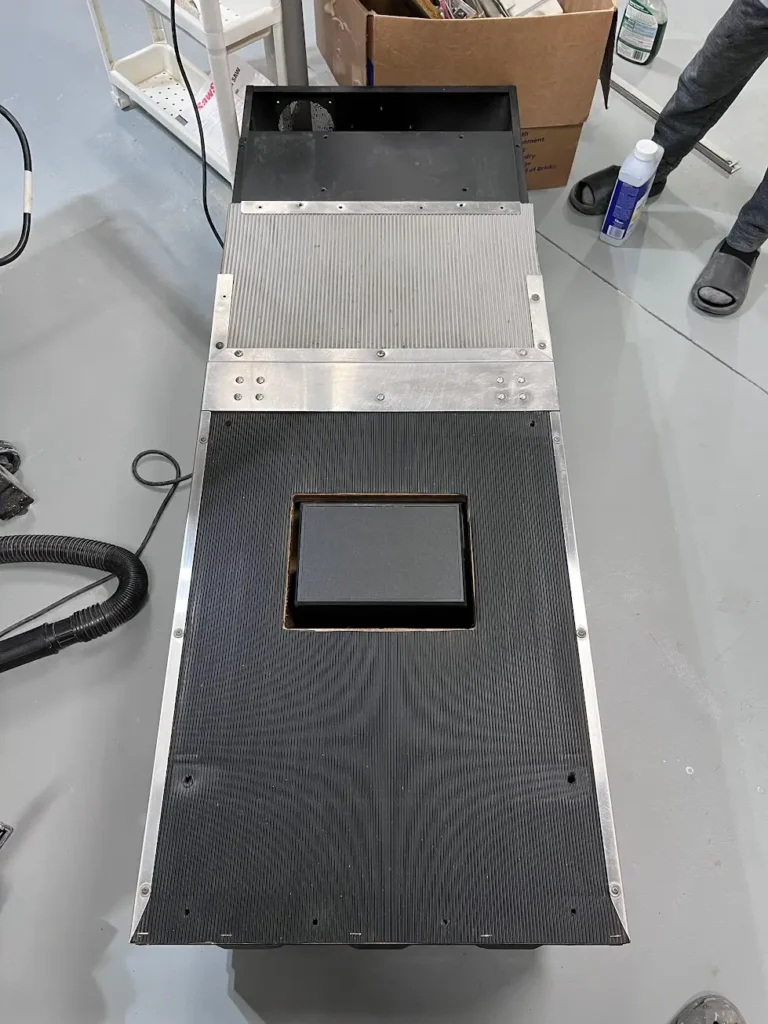
Base
The top of the bases was cleaned up mostly with a scrub brush and dish soap for the rubber parts and then a wire brush and mineral spirits to clean up the metal. Disassembling all of this has to happen before cleaning any of it because all of the electronics and PCBs are in the base and the last thing you want to do is drip cleaner and the grime from the base onto the PCBs.
Seat
The seats were wiped down and in some cases sanded where who-knows-what was stuck to them. I put back the subwoofer in Cabinet 1, which was using mostly original components.

Cabinet 1 Mostly Restored
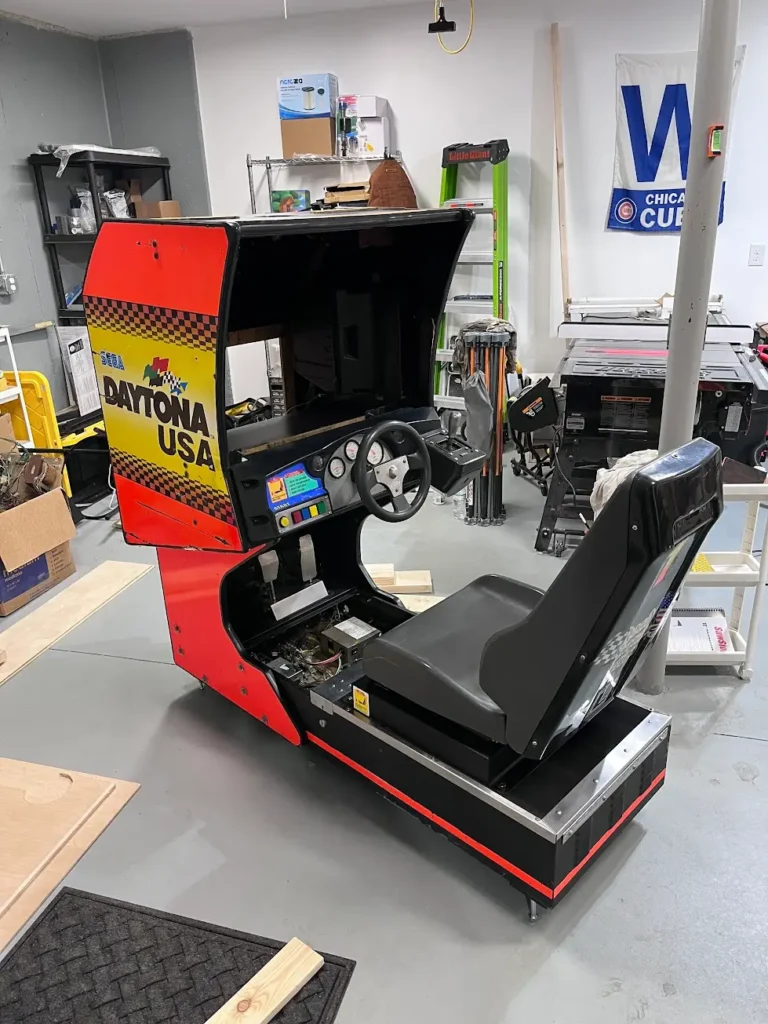
Cabinet 1 kept most of the original components. All of the front PCBs and power supply stayed in the cabinet. However, since I am using a PC to run emulation with this, I did not need the Model 2 boards. I pulled those out and put them in climate-controlled storage for now. Down the line, I may change my mind and get all original parts for these cabinets, but for now I’m emulating the software.
I put a 32″ curved LCD monitor into both cabinets (which fit nearly perfectly across the entire width of the vertical cabinet. I used some fabric behind them to make them look a little nicer.
Using Original Daytona USA Hardware for Emulation
For Cabinet 1, having all of the original hardware was a blessing and a curse. Of course, keeping the original hardware would make that side of the cabinet as authentic as possible. On the other hand, it meant there was no plug-and-play option for getting the software to work directly with the original hardware.
I researched getting the original Daytona USA hardware to work with emulation and found the M2 Mega Adapter by Tibal, an enthusiast who makes these custom boards that work with a myriad of Sega machines. After reaching out and telling him what I wanted to do, he supplied me with the board that would take all of the original hardware as inputs and output it all via a USB to my PC that was emulating the software.
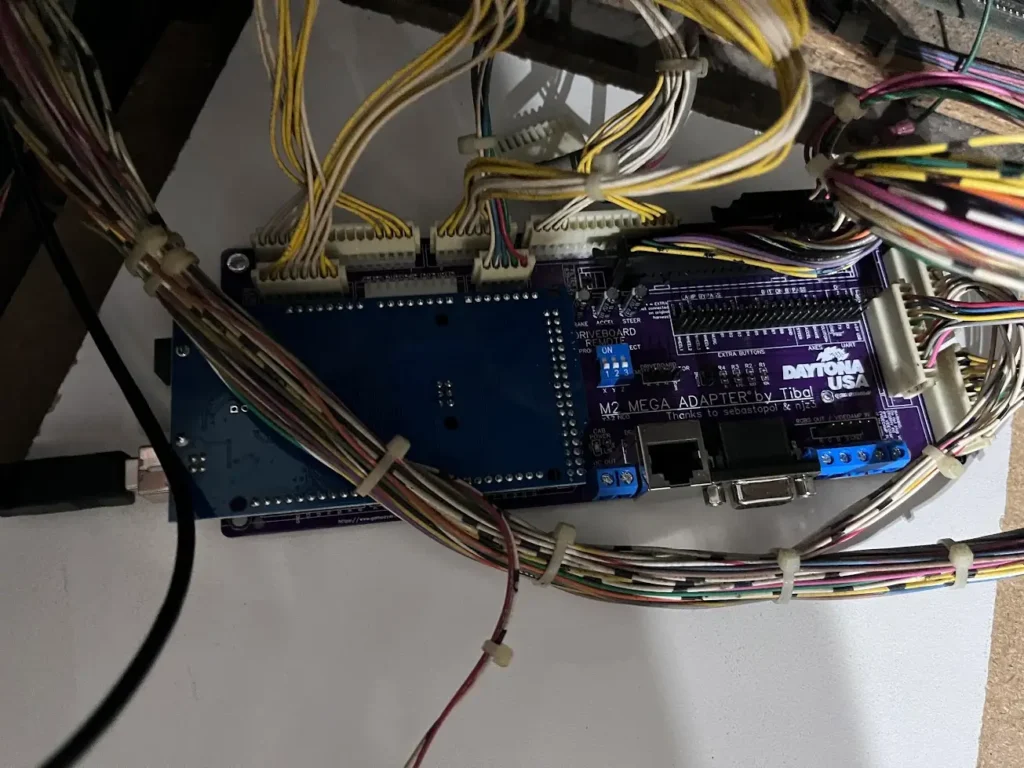
This little board replaces all of the PCBs in the bottom of the cabinet with the exception of the sound boards (which can be used by the PC with an audio cable going from the PC to the mixing board.)
Cabinet 2 Restored for Emulation-Only
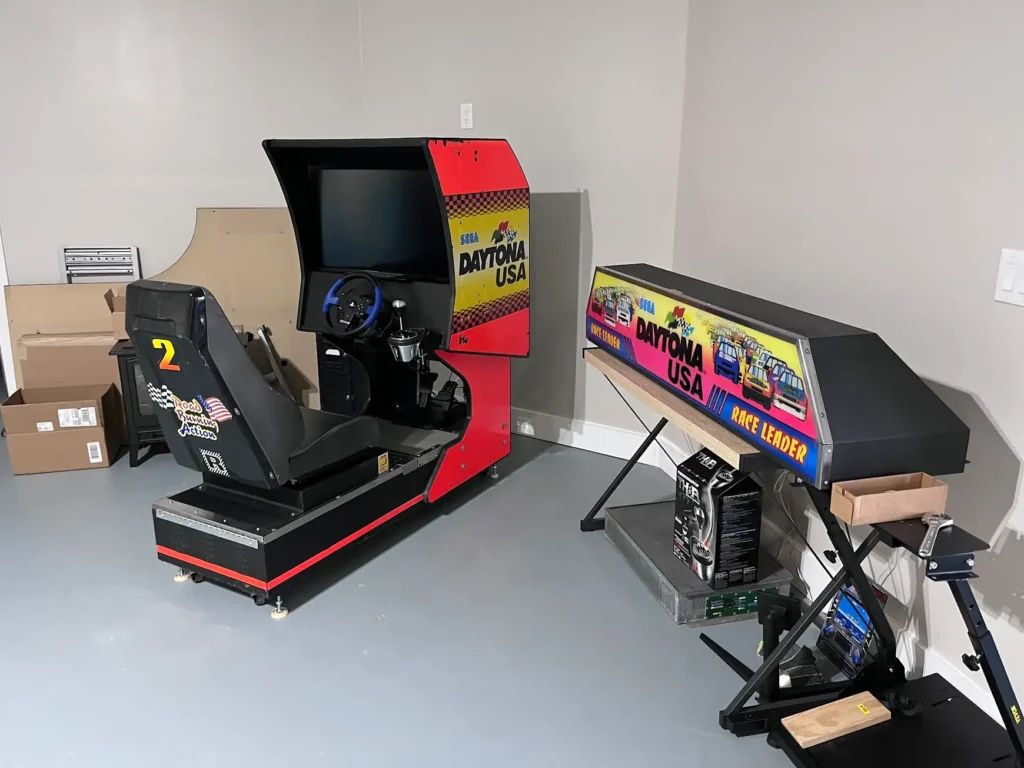
Cabinet 2 never had a steering control panel nor a monitor. It also had pedals that were in terrible shape that I ended up giving away to the guy who bought the CRT from Cabinet 1.
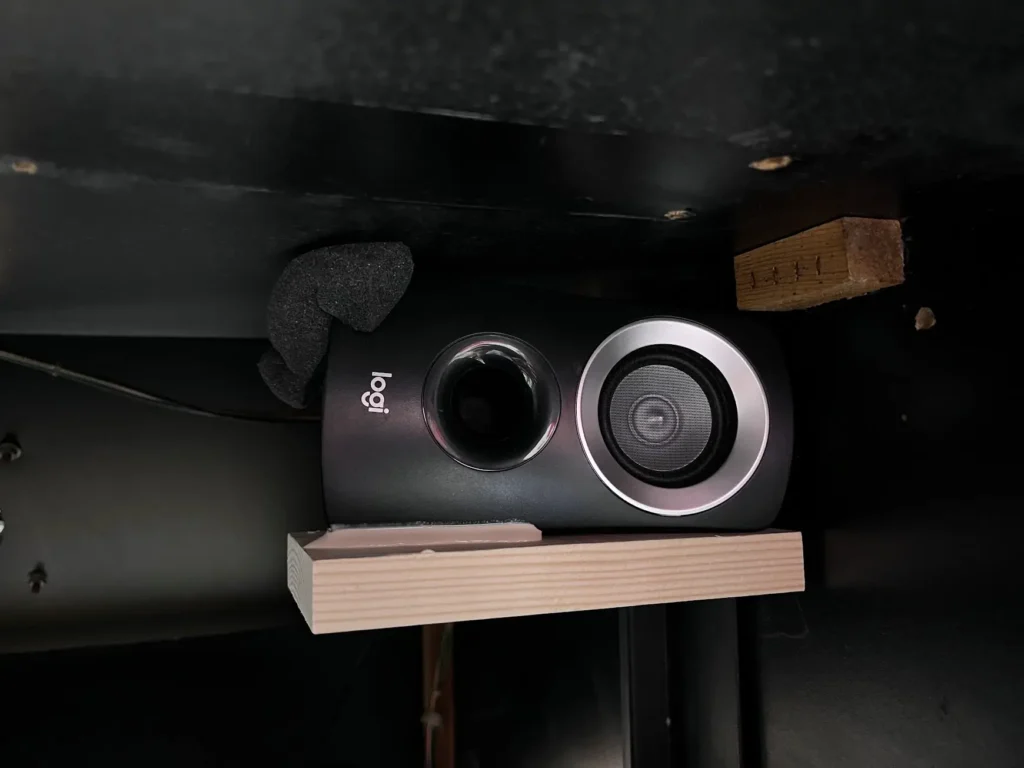
So, Cabinet 2 is basically a full conversion to PC racing sim hardware. I made a custom steering panel with a Thrustmaster 150 wheel and pedals, along with a Thrustmaster TH8A gear shift. For sound, I routed a set of Logitech speakers with their subwoofer mounted directly under the seat, just like the original hardware. The speakers were mounted above a 32″ curved monitor (the same type I used in Cabinet 1), by using existing bolts to mount a small board as a shelf that the speakers could be fastened to. I ended up just wedging the speaker in and using wood glue to hold it to the shelf.
Because it didn’t use any original hardware, Cabinet 2 was the first one that I set up. Honestly, it runs great. The only issue I’ve run into is that the Model 2 emulator hates the Thrustmaster 150 and counts all of its inputs as a single button. It requires you to map every other button (coin, start, views, etc.) without the wheel connected to the PC and then only mapping the steering and pedals afterward.
Final Refurbished Daytona USA Twin Cabinets
After many months of on and off again work, both cabinets were completed. I’m still working on getting the emulation software to work between them. But the hardware is completely restored and replaced at this point.
Restoring the Daytona USA Twin cab required several tools:
- Security screw set because these things were made to not be opened by amateurs or kids off the street
- Wrench (socket wrench and sockets if you want to save yourself a TON of time)
- Philips and standard screwdrivers (standard for bending back metal that has been bent over time)
- Wire brush for scraping off grime and rust from metal components
- Simple Green or another multi-purpose cleaner
- Rust remover for taking off rust that can’t quite come off with a wire brush
- Mineral spirits to shine up the metal
- TONS of rags that you will never use again (they get really gross)
- Flat black paint to touch up areas on the metal body that are beyond scrubbing. The base and marquee are flat black paint
- Scrub brush and dish soap to clean the rubber tops of the base
- Bar-keeper’s Friend for cleaning rust and grime off of the artwork (but be careful not to scrub too hard)